In Azure, there are various ways to control and restrict the flow of traffic into, out of or between resources depending on the resource in question and the pricing tier used. A common scenario where you might want to restrict traffic is with an API flow where you may want some of your resources to have a public IP address, yet you don’t necessarily want those resources to be accessible to anyone and everyone publicly.
For example, I have an API flow that uses several Azure services and looks something like this:

The main processing engine for the APIs is the Azure Function app, and I have one API that needs to call another internal API on a load-balanced VM set. The Function app is fronted by an API management instance which provides policies and validation, and since the FA has vNet access, I use access restrictions so that it will only accept traffic directly from the APIM instance.
In front of APIM is Azure Front Door, which provides a public endpoint for the APIs and uses Web Application Firewall rules to provide a layer of security. To restrict access on the APIM instance to the Front door only it is possible to use vNet integration together with a Network Security group and firewall rules. However, vNet integration for APIM is only available in the Premium tier, which is extremely expensive and not cost effective for this particular solution. Additionally, a private link to APIM is not yet supported by AFD.
A far cheaper way to lock access is to use the check-header and ip-filter APIM policies. The check-header policy ensures that every API request must contain the unique ID of the Front door instance as a header, and the ip-filter policy contains all the Microsoft public IPs used by the backend of the Front door service. With both inbound policies in place on the API product, my APIs will only accept traffic from the Front door.

A small problem with this approach though is that the Microsoft public IP ranges used by Azure services can change – in fact Microsoft publish a document containing all the IP ranges used by its public services in Azure, and this is updated every week. Even though not all the IP ranges for every service will change every week of course, you still need to check.
Since this is laborious manual work, I decided to automate the process using Azure automation. I created a runbook that will download the latest Azure IP ranges document from Microsoft, read all the IPv4 public IP ranges used by the Azure Front door backend and save them all to an Azure storage table. Each time the runbook executes, it checks whether a new document is available and if so, downloads it. It then checks whether there are any new or any retired IP ranges for the AFD backend, and if so, updates the Azure table and drops me an email so I’m aware of the changes. I guess if I were really lazy I could also automate updating the ip-filter policy in the APIM product, but for now the email notification is sufficient.
Here’s an example output of the runbook making the mentioned changes:

And here’s an example email notification:

Although I’m only interested in IP range changes for the AFD backend, the same runbook script can be used for any Azure service with a tag – you just specify the tag name in the script.
The runbook can be downloaded here.
To use the runbook, you first need an Azure automation account with a system managed identity enabled. You also need an Azure storage account.
Then grant the automation account managed identity role-based access to the storage account, assigning the Reader and Data Access and Storage Table Data Contributor roles. You can, of course, create a custom role containing just the minimum required permissions if you prefer.

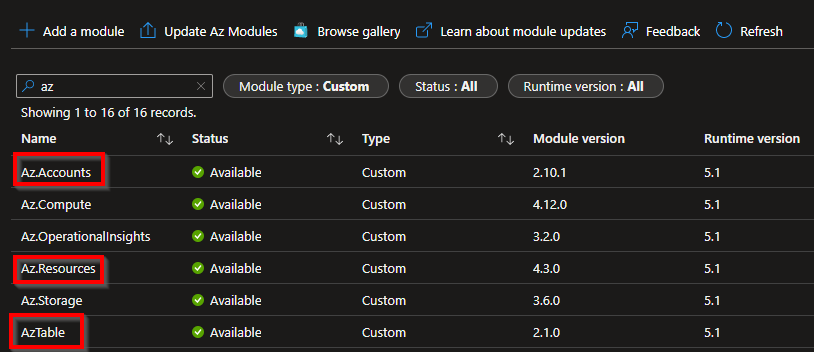
You’ll need to import the Az.Accounts, Az.Resources and AzTable modules into your automation account from the gallery:
In the runbook script, update the parameters at the top of the script. First the details for your storage account:
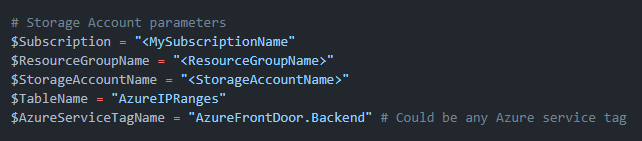
Specify which Azure service tag you want to use, in my case ‘AzureFrontDoor.Backend’. You don’t need to pre-create the storage table, the runbook will create it for you.
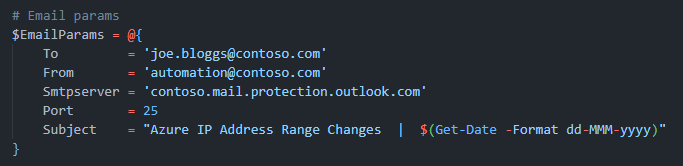
Then populate your email parameters, in this case I’m relaying with Microsoft 365 SMTP.
Then create the automation runbook using the 5.1 PowerShell runtime, and execute! I schedule the runbook to run just once a week as the Azure IP ranges document is only updated weekly, and changes will not go live in Azure for the first week.
After a successful execution, you’ll see the IP ranges listed against the service tag in the Azure table, as well as the change number and date which the runbook uses to reference against the latest document and service tag changes.

Very helpful article.