Some time ago I created a custom solution to provision Windows workstations and in this blog I wanted to share how that solution works. This is not a community solution but simply an example of what can be possible with a little creativity and technical know-how!
I work for an American company with a global presence and when I first joined in early 2019 they were using traditional OSD task sequences with ConfigMgr to provision workstations – something I had also done for several years. It worked perfectly well, but there were frustrations:
- The admin overhead of regular driver pack and reference image updates
- Build time could be 60 minutes
- Could not provision Azure AD joined devices
We started to work with Windows Autopilot as a modern provisioning solution. Autopilot conceptually works quite differently to traditional ConfigMgr task sequences and I found that a large part of the provisioning process had to be scripted as there was no native capability to do many of the things I wanted to do. In fact, so much of the process was scripted that one day it dawned on me – why don’t I just create my own provisioning solution?!
So I did. I call it ProvisionIT because I’m super original 🙂 ProvisionIT soon became the default method for provisioning new Windows workstations and we even dropped both ConfigMgr OSD and Autopilot in favour of it.
Like any custom or community solution, there are pros and cons. A big benefit for us was speed – we drastically reduced the overall deployment time and this was a key goal of the solution. In fact, across more than 3,000 deployments since we first started using it the average provisioning time is 10 minutes 38 seconds.
Other benefits include:
- No dependency on any existing management tools (though we do enrol into Intune and we do install the ConfigMgr client)
- Can deploy both domain-joined and Azure AD joined devices
- For Azure AD joined devices, there is no dependency on any on-prem infrastructure and no dependency on corporate network connectivity – workstations can be provisioned anywhere there is an internet connection
- The solution is customised to our requirements – it only does what we want it to, in the way we want to do it
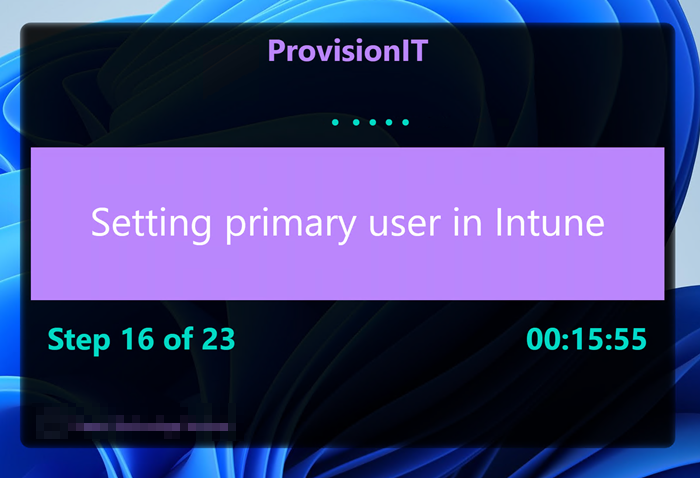
- I can deploy new features whenever I want, without having to create a feature request to Microsoft and hope it gets actioned. For example, just recently (as per our business requirements) I added the capability to set the Primary user in Intune during the provisioning process.
On the down-side, adding new capabilities can be time-consuming (depending on the requirements). Over the years I have accumulated a certain skill set – I am comfortable with scripting in PowerShell, coding in C#, creating WPF UIs and working with various Azure services. Not everyone has this skill set though, so to avoid creating a dependency on yourself the solution has to be well documented and you need the equivalent skills and know-how among your team members to maintain the solution in your absence. Worst case – you have to drop the solution and revert back to the ‘Microsoft-supported’ methods – which isn’t the end of the world 🙂
One of the reasons ProvisionIT is fast is that it doesn’t provision Windows or drivers. It assumes you already have those in place. We worked with our vendor to ship our workstations with a low-maintenance image that includes only the vanilla OS with most of the vendor ‘bloatware’ removed, M365 apps with our custom configuration and vendor drivers installed. We also suppress the OOBE and set a custom local admin password.
When a technician receives a workstation, they unbox it and power up. They log into Windows as the local administrator, connect to the internet and run ProvisionIT. When the provisioning is finished, they reboot and the workstation is ready to go.
So How does it work?
ProvisionIT is started with an executable file. The tech copies this to the workstation desktop and runs it as admin. The self-contained executable is coded in C# and compiled for the .Net Framework. The exe does not contain the full application payload – rather it downloads this from our Azure CDN after completing its initial checks. The reason for separating the exe from the main payload is that the exe is generally static and doesn’t need updating often. Whereas the application files may be updated more frequently when software is updated, or new software added, or new features added. The exe always downloads the latest files from our production container in the Azure CDN. The reason for using a CDN is that files can be cached in various locations throughout the globe and you have quick local access when downloading wherever you are.
The exe runs a few checks:
- Check that you’re running as admin
- Check that you have internet access
- Check that you can access the CDN endpoint
Then it prompts you to authenticate with Azure AD. There are a couple of reasons for this:
- It provides a security gate. You can only run ProvisionIT if you can successfully authenticate with our AAD tenant
- We also run a couple of Graph requests and check whether you are a member of a specific AAD group that permits you to use ProvisionIT
- We also get an auth token for the deployer that we will use later in the process for Graph requests
Graph calls are made via an Azure AD app registration which has sufficient delegated privileges to MS Graph.
Once you’ve successfully authenticated, the exe creates a working directory under ProgramData and downloads a file manifest from the CDN. This contains a list of all the files needed for the solution.
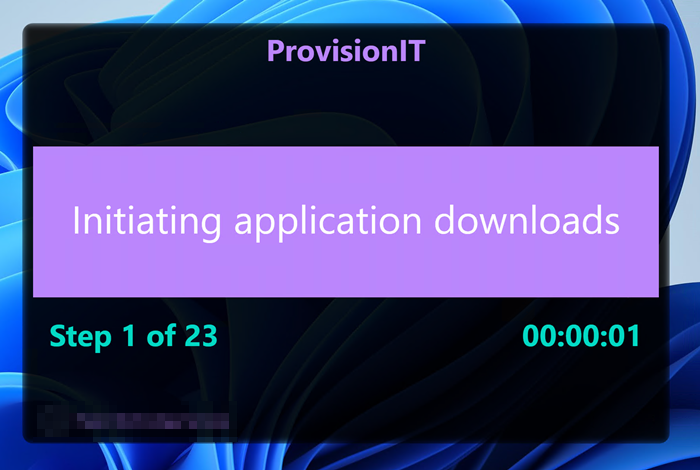
It then creates an embedded PowerShell instance. It uses this to run all the scripts within the host process, without needing to create a separate PowerShell process. It executes an initial script that’s embedded as a resource in the exe which creates a small WPF splash screen while it downloads the application files, which typically takes just a couple of seconds.
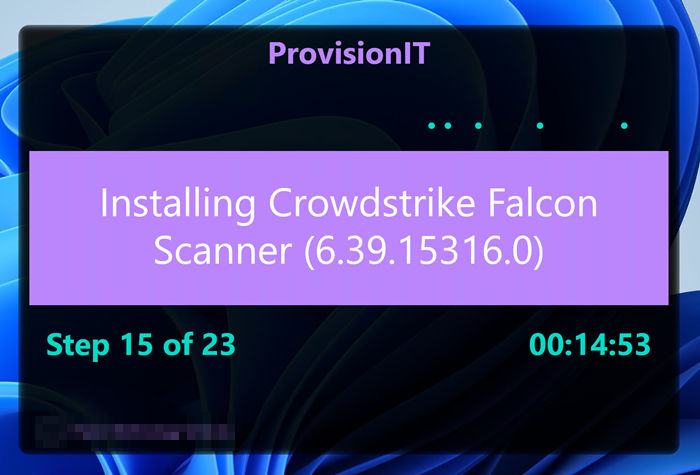
Once the files are downloaded, it hands off to the main provisioning script which creates a WPF window which is used to track the progress of the provisioning activities.
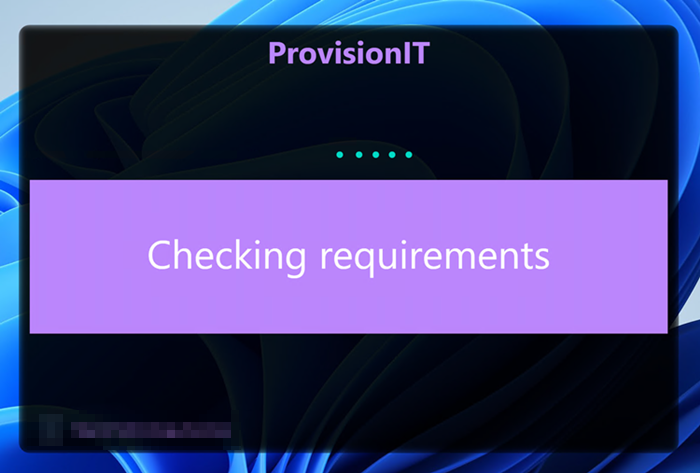
The first thing it does it to run a requirements check. This assesses the workstation to figure out what needs to be done to bring it to the corporate standard. The reason for running this assessment initially is that ProvisionIT can actually be run on any workstation in any state – it will only do whatever actions are needed. For example, if it’s already AAD joined then it will skip that part and just do the rest.
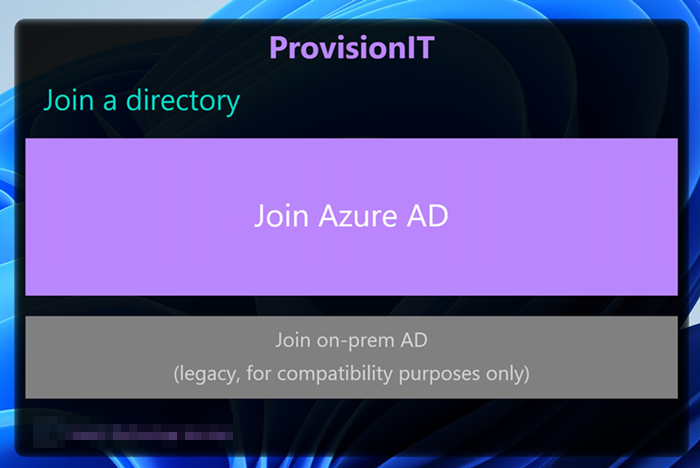
Assuming its a vanilla build, it will then display the directory join window. Our default is to join Azure AD, but we have the option to join the AD domain where this may still be required. In this blog, we’ll choose the Join Azure AD option.
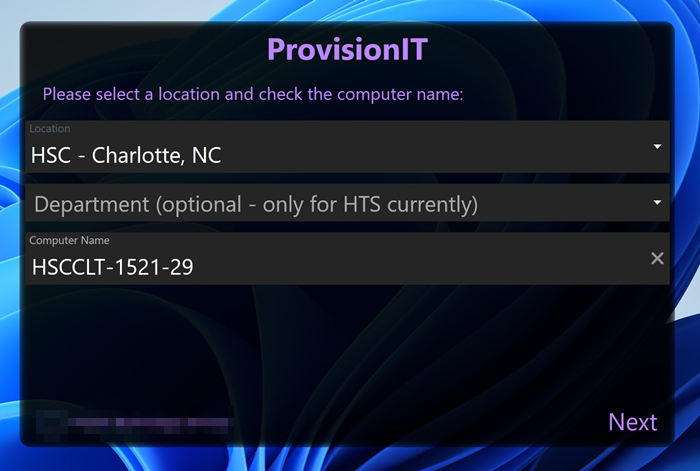
You are then asked to select a site. As we are a global company, you need to choose which site you are provisioning the workstation for, and this will determine the automatically calculated computer name which uses a site prefix and characters from the serial number. You can amend the computer name here if you wish.
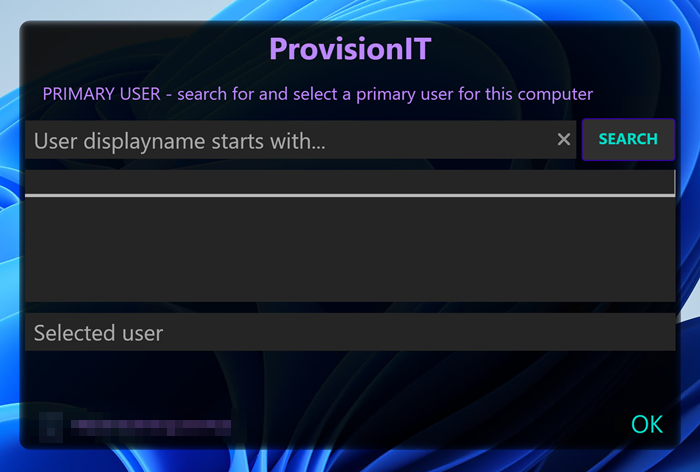
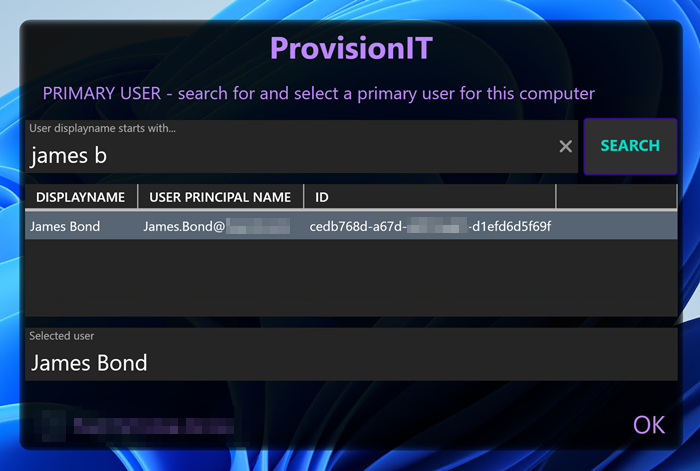
Click Next and you are asked to select the Primary user for the workstation in Intune. You enter the search criteria and this executes a Graph request displaying the results in the table. Select the relevant user from the table.
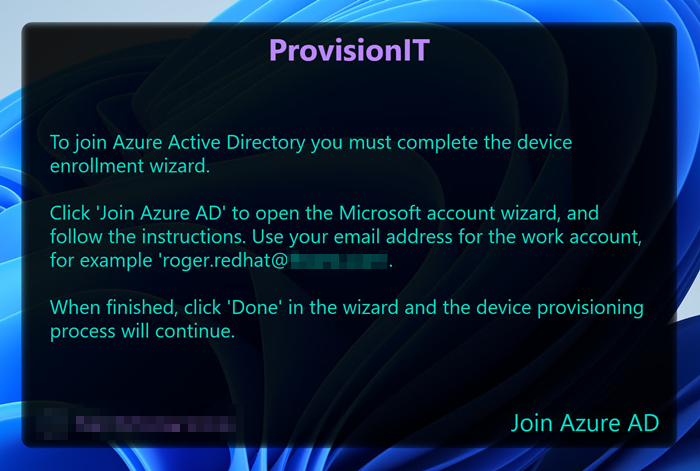
Click OK and then you are asked to join Azure AD. Click the Join Azure AD button and it brings up the native AAD join experience. Rather than use a bulk enrolment token that needs to be regularly refreshed and joins AAD in a userless context, I prefer to interact with the deployer and get them to join AAD using the built-in process. This will also enrol the device into Intune as the deployer will be configured for MDM auto-enrolment in the MDM user scope.

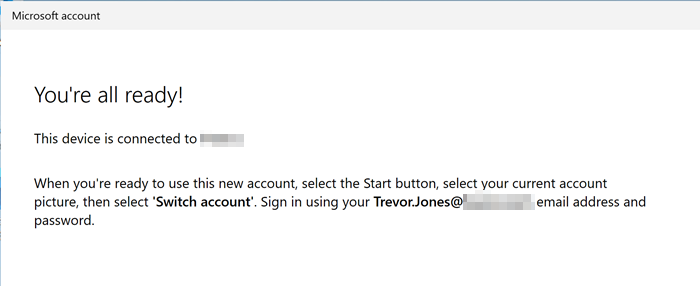
Once the AAD join is complete, the rest of the process is automated and you can just sit and watch.
The first thing that happens is we initiate the downloads of the software content via BITS. We do this at the start so that we can multi-task – while the BITS jobs are running we do other things such as configure Windows, remove inbox apps, apply initial policy settings in the registry etc. When we come to install software, we start with the smallest installer files which will have downloaded the quickest and work up to the bigger ones. In this way, there is little or no delay waiting for content to download.
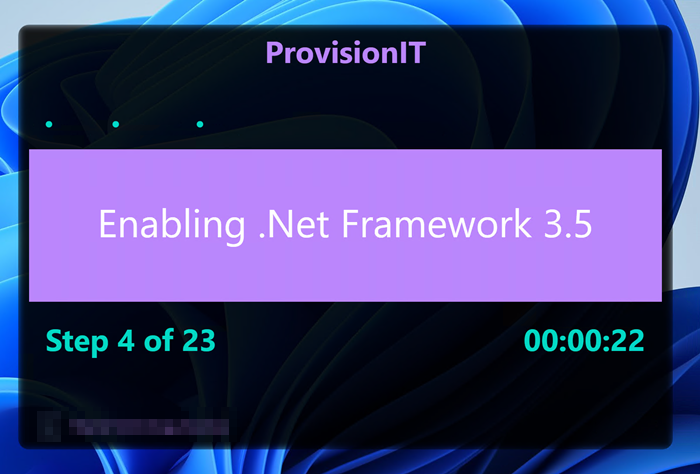
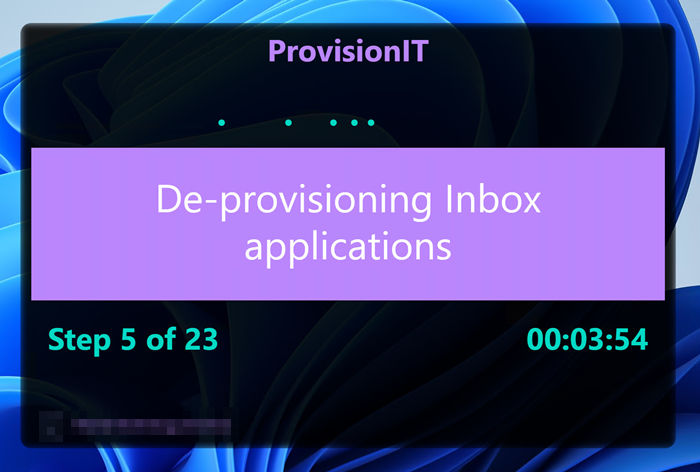
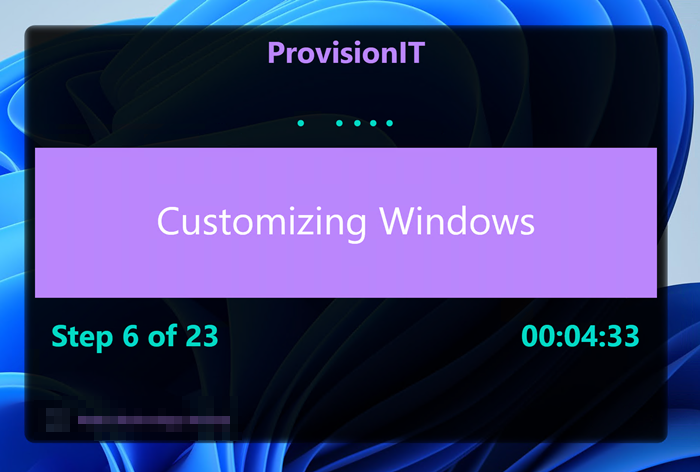
Some of the things the provisioning process does includes:
- Install .Net Framework 3.5 (some apps still require it!)
- Configure the local administrator account and enrol into our Modern LAPS password rotation solution
- Install a Windows VL key and activate
- Install and configure language options if required
- Remove the consumer version of Teams for W11
- Remove the chat icon in W11
- Import a custom start menu layout
- Set the timezone and synchronize the time
- Disable the user ESP in the registry
- Remove unwanted inbox apps
- Rename the computer, or join the domain if required
- Set the computer description in AD if required
- Enable bitlocker protection
- Set the BIOS password
- Configure OneDrive KFM
- Install the corporate WiFi profile
- Install a custom power plan
- Install trusted root certificates
- Set the primary user in Intune
- Install software
- …and more
How long the provisioning process takes really depends on your internet bandwidth and the workstation performance. With a reasonable bandwidth of maybe 20 Mbps or more there are typically no delays. Just earlier I deployed a new Asus ExpertBook here in Brazil with a 100Mbps internet line in less than 5 minutes.
Once the provisioning process is finished, we request a reboot.
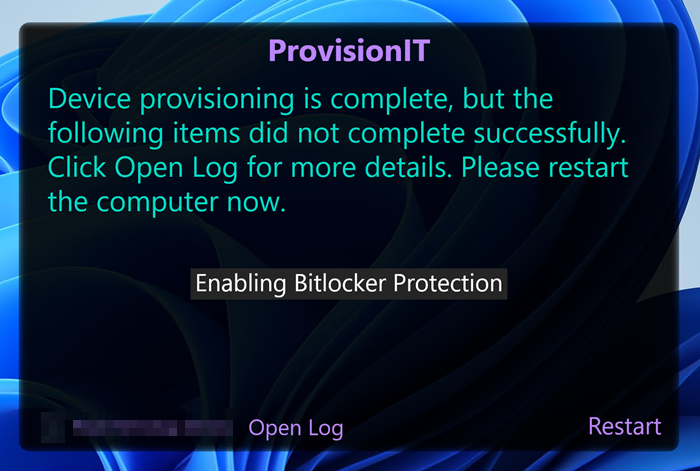
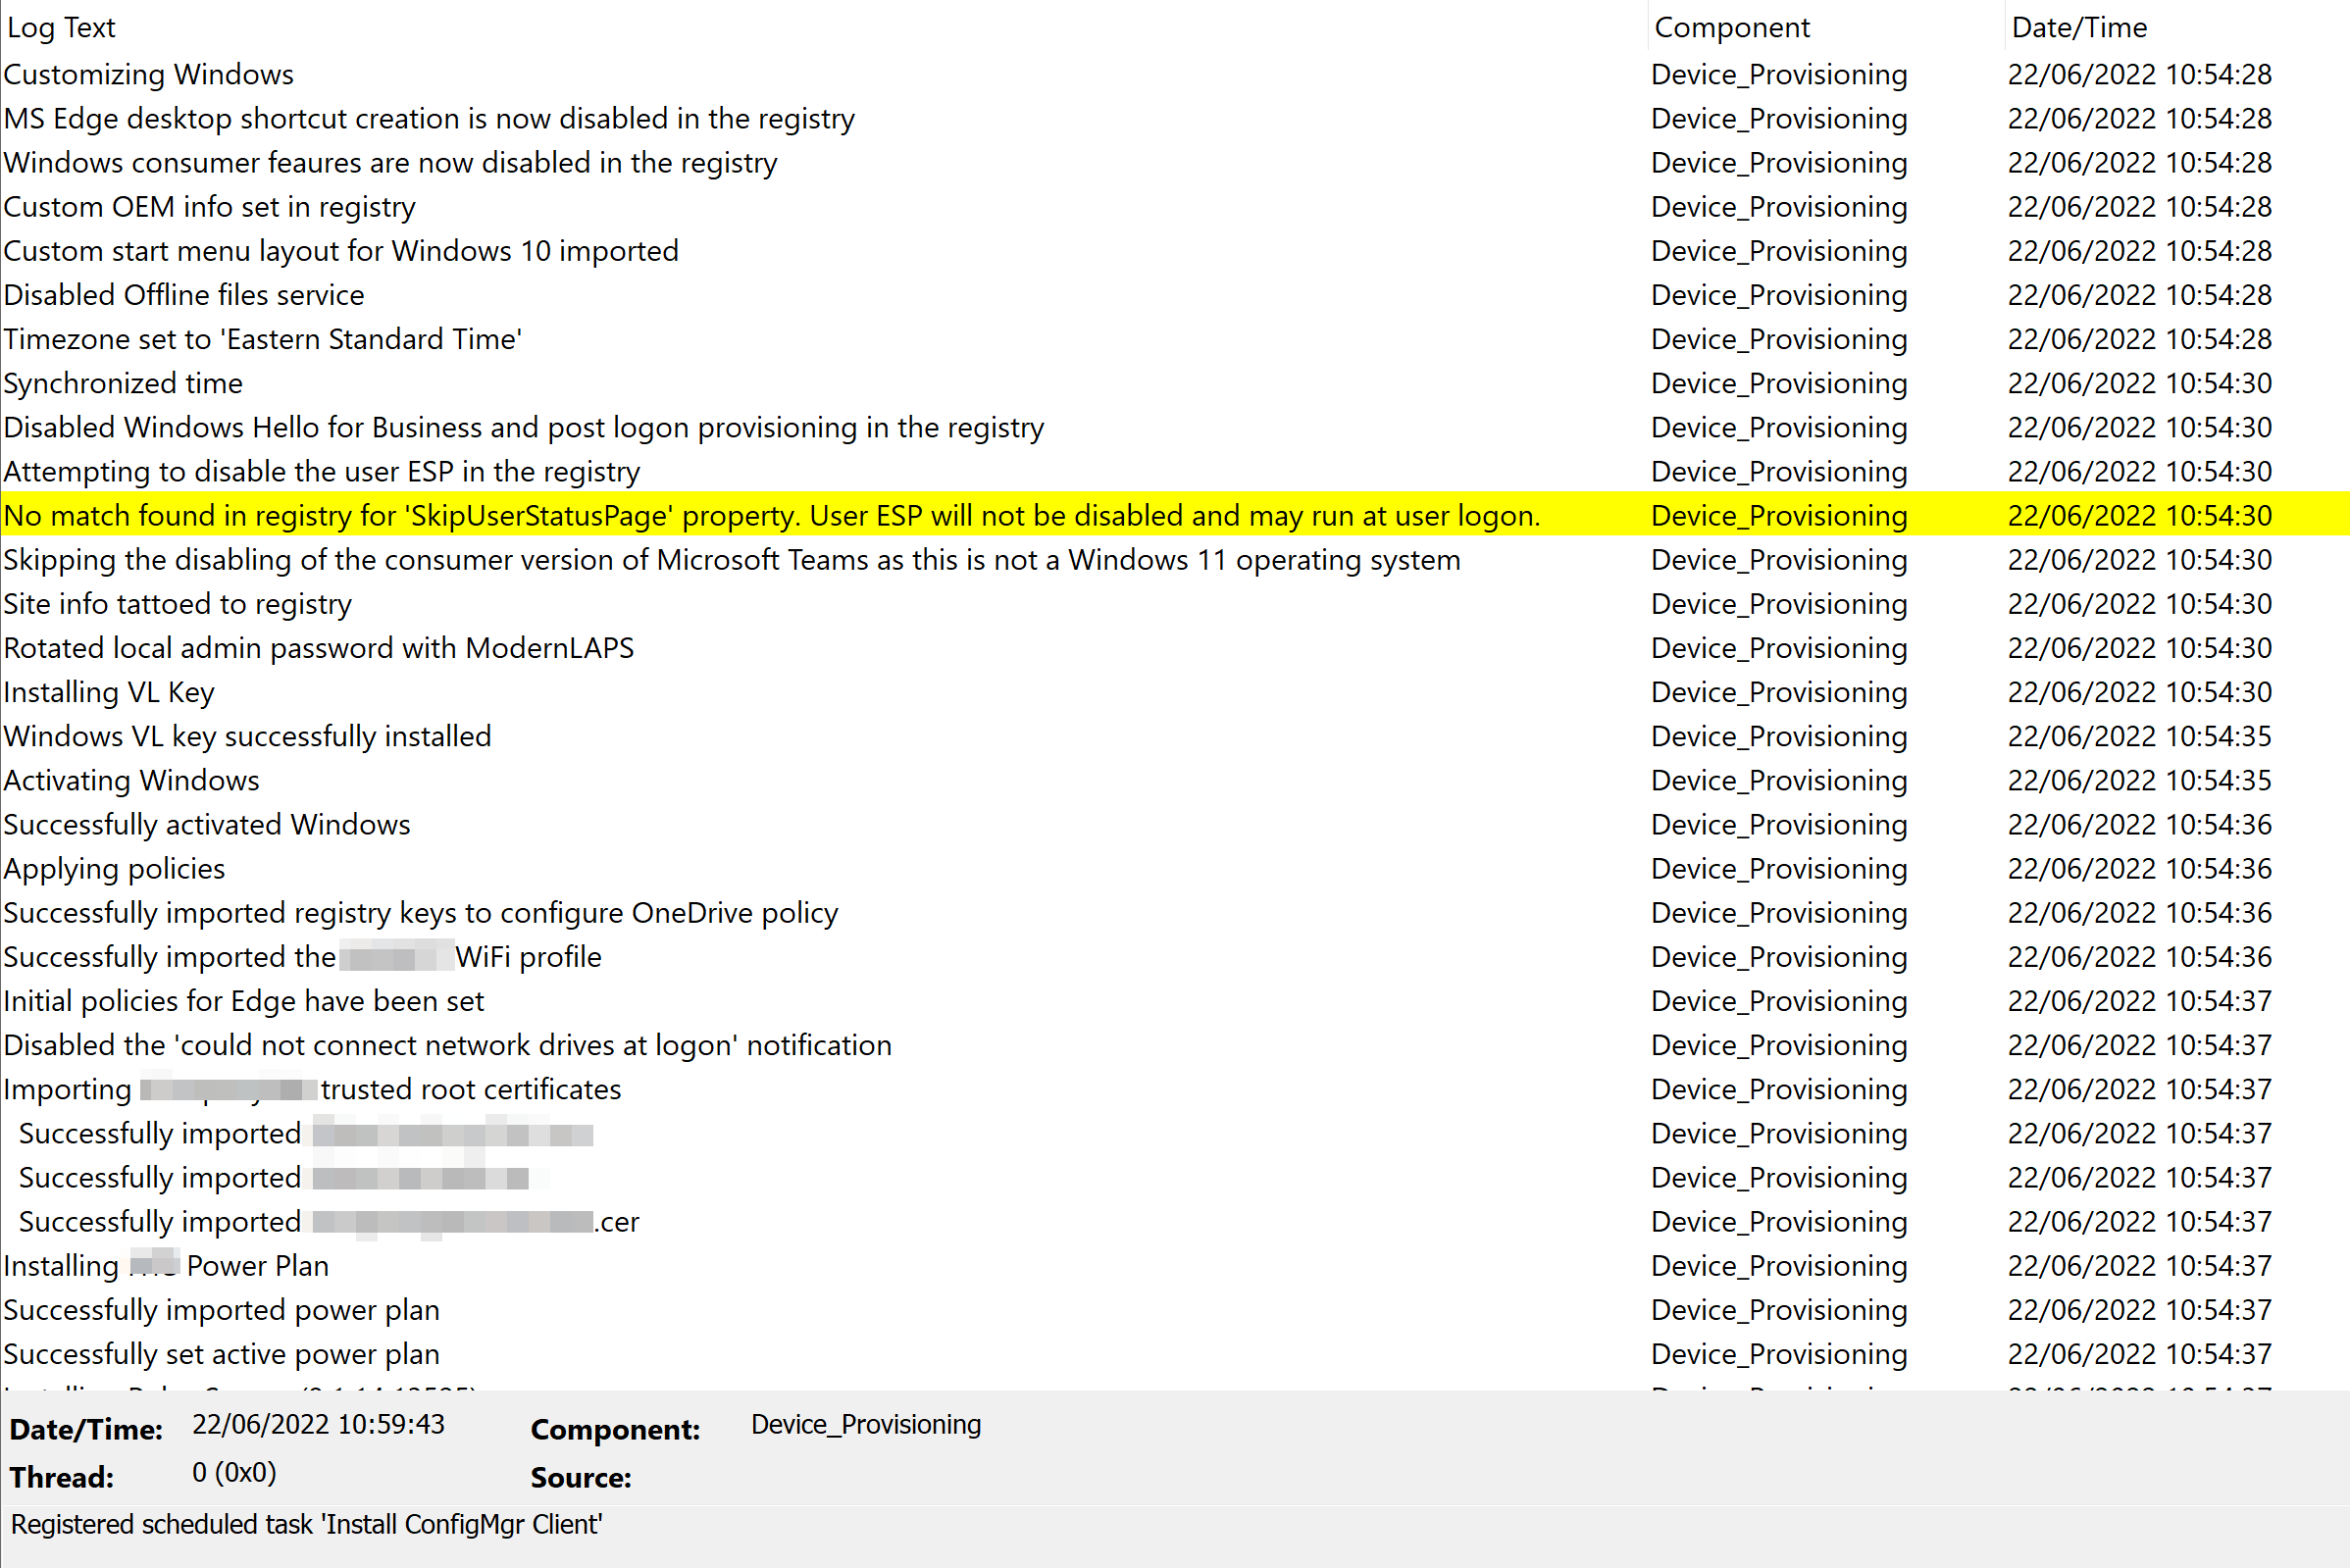
If any of the key provisioning activities failed, we list them in the final window. This is so the tech can be notified and remediate them manually before handing the device to the end user. You can also review the provisioning log file from here.
In this case we failed to enable Bitlocker because I was running it in a VM and left the Windows DVD attached and Bitlocker doesn’t like that…oops 🙂
Technically the process is not quite finished at this point as we install a couple of self deleting scheduled tasks that run at the next user logon and do a couple of ‘post-deployment’ actions such as clean up the working directory, clean local accounts and local admin group membership and initiate the install of the ConfigMgr client. We install that post-reboot as we install via the CMG and this can sometimes take a while to get properly installed, registered and functioning so rather than delay the provisioning process we let it run in the background after the reboot. We also do a couple of things that need to run in the user context, such as configuring language settings and mapping network drives.
Reporting
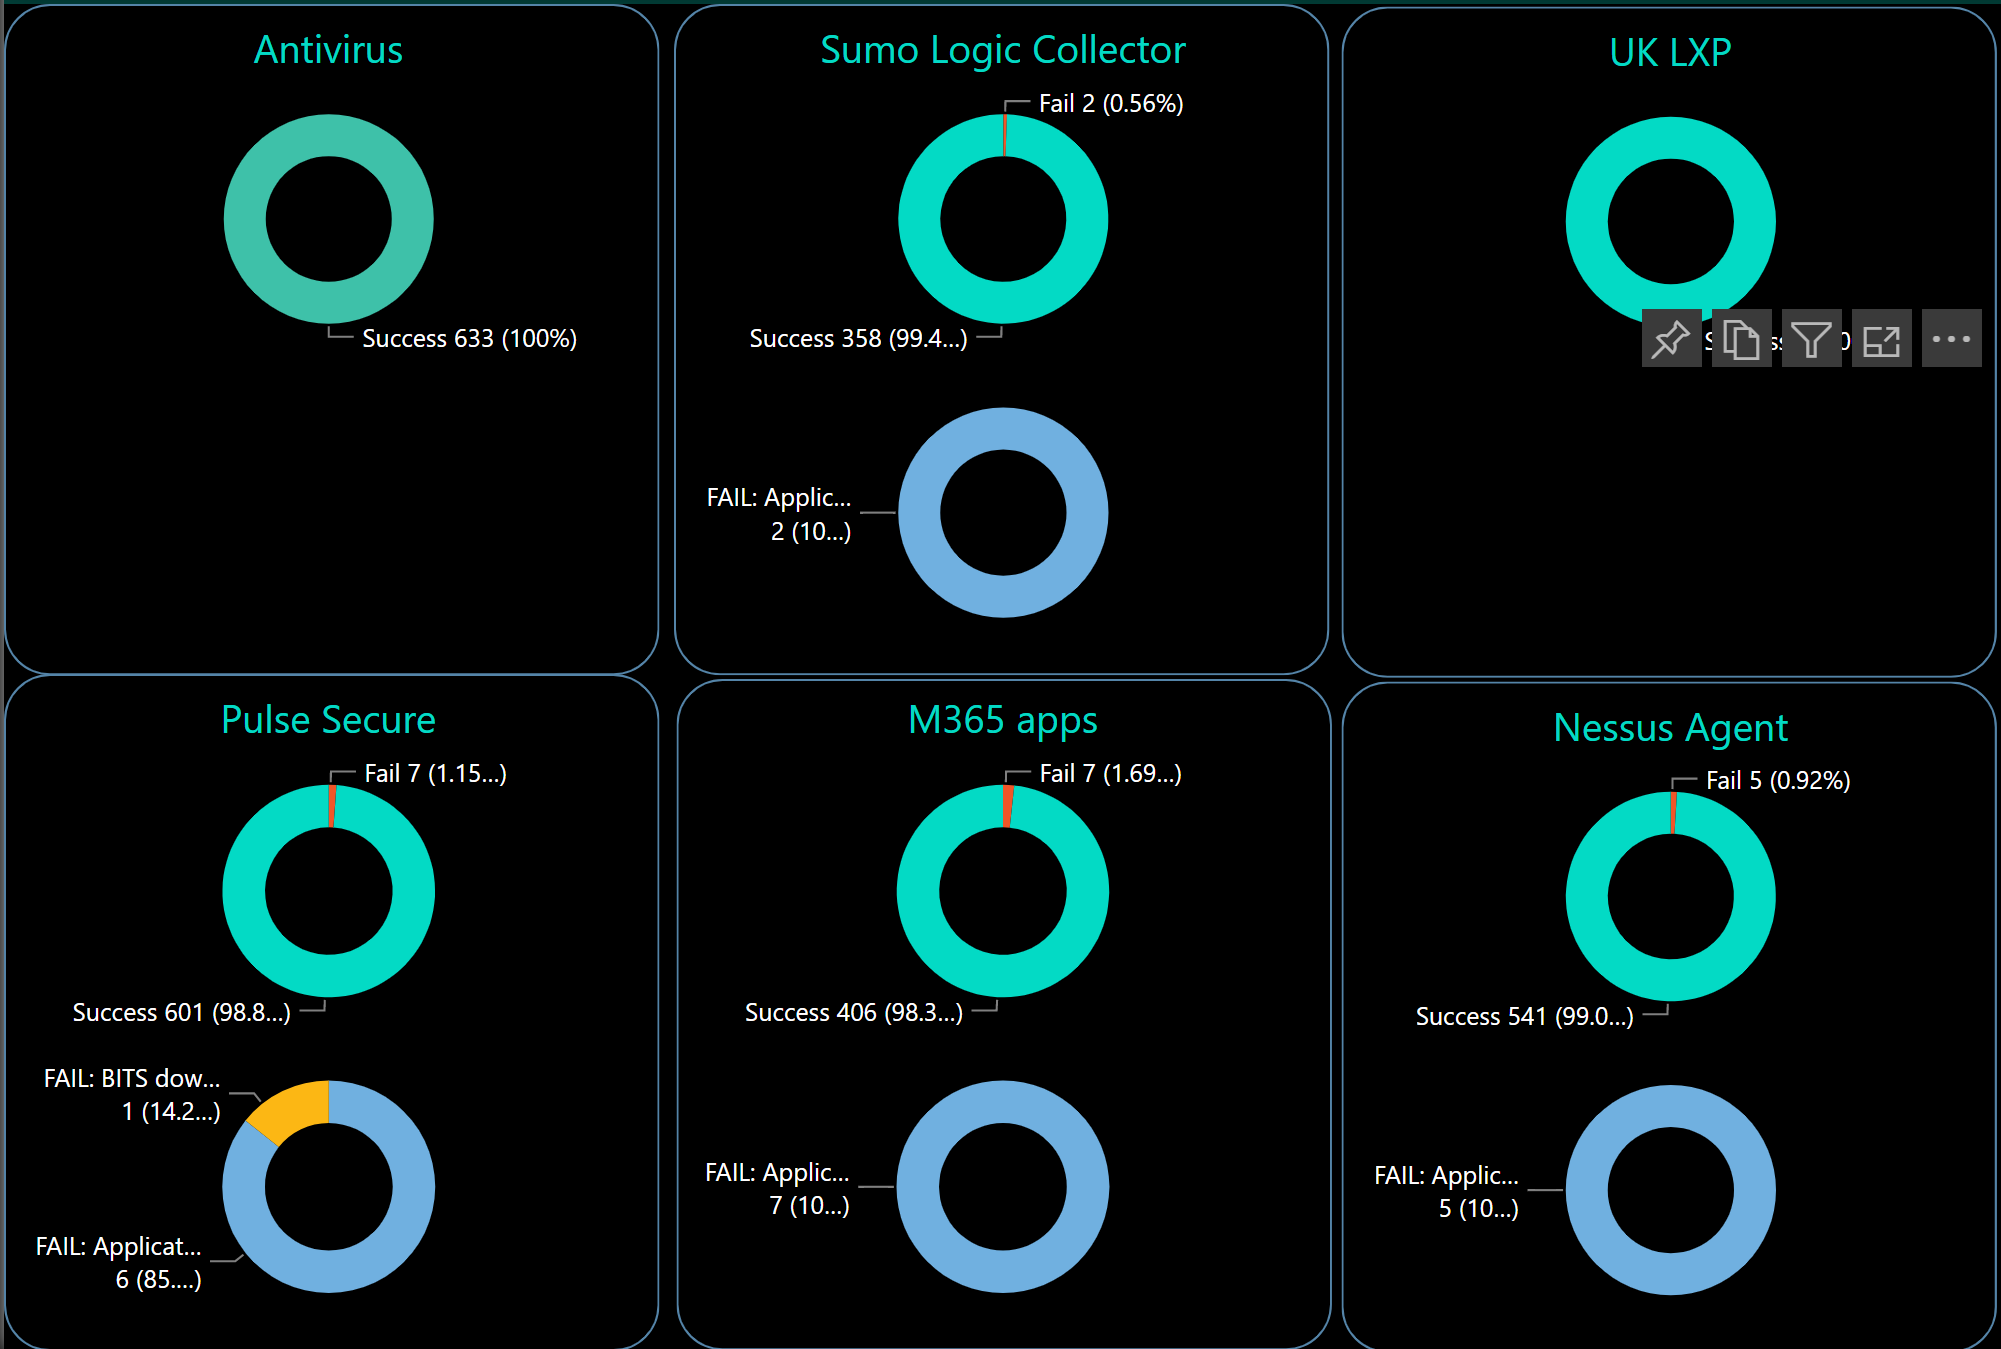
Just before the provisioning process finishes, we fire off a ‘status message’ which contains a summary of the deployment, which activities were performed and their status etc. This gets sent as an http request to Azure Event Grid (for speed and resilience). Event grid passes the data to an Azure function via a subscription and the Azure function injects the data into an Azure SQL database. This database then becomes the source for our Power BI deployment report.
We have a dashboard with deployments by site, AD vs AAD joins, top deployers, top models, average deployment duration and a deployment timeline.
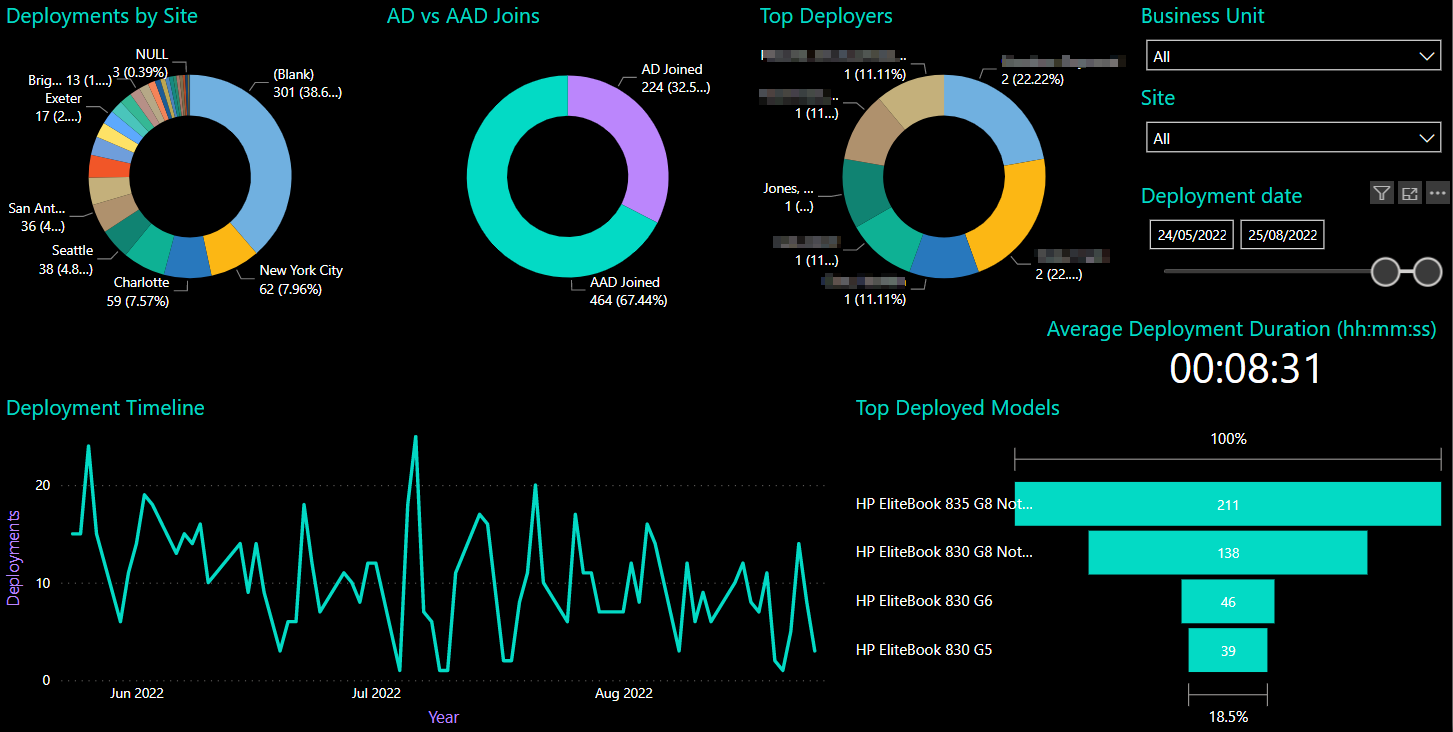
We can view all deployments and the data for each:


We can review the different provisioning activities and their success rates, for example for software installs:
Etc…
Logging
We also do reasonably detailed logging during the provisioning process to a local log file. This is then uploaded to an Azure storage account at the end of the process so we have a central place for all our deployment logs and can view detailed deployment info per device if we need to troubleshoot anything.
Final thoughts
ProvisionIT works well for us because we still follow the traditional model of having on-site technicians prepare workstations – whether at home or in the office – before handing them out to end users. But the business also desires to have the ability to ship laptops directly to end users and have them automatically provisioned, so to facilitate this scenario we have resurrected Windows Autopilot as well. But we will use Autopilot simply as a mechanism to sort of bootstrap the device into management before handing off to our custom provisioning process. I was able to reuse much of the code from ProvisionIT and make it work with Autopilot to create a nice, seamless provisioning experience. Maybe I will write about that in a later blog 🙂
Thank you Trever for the great article, Is there a place i can grab the scripts that you have developed for this process.
Not really, sorry. It has been developed specifically for the company I work for which is why its not a community solution as such, just an example of what’s possible.
What’s the approach you took for setting the BIOS password without prompt?
We use WMI for that. Since there is no password already set on a bare-metal device, there is no need to provide an existing one when setting it.
I would be interested in a bit more details, if you’re willing to share.
So far, I have been playing with Lenovo hardware and it wasn’t possible to set-up BIOS password through WMI because of security restriction that requires physical presence for configuring the supervisor password.
Once it has been set, it was possible to make changes.
Sure, here’s a code snippet for how we do it with HP. it assumes there is no password already set.
Trevor, this is awesome. I’ve developed a similar script this past year to combat the similar issues, but not nearly as fleshed out and dynamic as yours (nor as pretty as a GUI).
I saw one of your comments saying you wouldn’t be sharing it out (understandable). Do you think at any point in time you would be willing to share a dumbed-down version?
I’ll look into it. It’s heavily bespoke which makes it a little tricky…
Honestly, I can’t speak for all, but the main thing I would be grateful for is how you set up the CDN and are installing from it, as well as pulling the data into PowerBI. But I 100% do understand if it’s not doable for you and I won’t stress at all if you can’t do it. I’ll be looking into it myself regardless 🙂
I just use Azure CDN which is basically a storage account with an endpoint to a globally distributed cache. Client-side, I run BITS jobs to download the content asynchronously while the provisioning app is configuring other things. The Power BI report just pulls from the Azure SQL database, but the reporting flow itself takes a bit longer to explain…!