This is the first blog post in what I hope will be a series of posts demonstrating several custom solutions I created for things such as feature update deployments, managing local admin password rotation, provisioning Windows 10 devices, managing drive mappings and more. My reasons for creating these solutions was to overcome some of the current limitations in existing products or processes, make things more cloud-first and independent of existing on-prem infrastructure where possible, and to more exactly meet the requirements of the business.
Although I will try to provide a generalised version of the source code where possible, I am not providing complete solutions that you can go ahead and use as is. Rather my intention is to inspire your own creativity, to give working examples of what could be done if you have the time and resource, and to provide source code as a reference or starting point for your own solutions should you wish to create them!
Someone asked me recently how we deploy feature updates and it was a difficult question to answer other than to say we use a custom-built process. Having used some of the existing methods available (ConfigMgr Software Updates, ConfigMgr custom WaaS process, Windows Update for Business) we concluded there were shortcomings in each of them, and this provided inspiration to create our own, customized process to give us the control, reliability, user experience and reporting capability that we desired. Don’t get me wrong – I am not saying these methods aren’t good – they just couldn’t do things exactly the way we wanted.
So I set out to create a bespoke process – one that we could customize according to our needs, that was largely independent of our existing Configuration Manager infrastructure and that could run on any device with internet access. This required making use of cloud services in Azure as well as a lot of custom scripting! In this blog, I’ll try to cover what I did and how it works.
User Experience
First, let’s look at the end user experience of the feature update installation process – this was something key for us, to improve the user experience keeping it simple yet informative, and able to respond appropriately to any upgrade issues.
Once the update is available to a device, a toast notification is displayed notifying the user that an update is available. Initially, this displays once a day and automatically dismisses after 25 seconds. (I’ve blanked out our corporate branding in all these images)

We use a soft deadline – ie the update is never forced on the user. Enforcing compliance is handled by user communications and involvement from our local technicians. With one week left before the deadline, we increase the frequency of the notifications to twice per day.
If the deadline has passed, we take a more aggressive approach with the notifications, modifying the image and text, displaying it every 30 minutes and it doesn’t leave the screen unless the user actions or dismisses it.
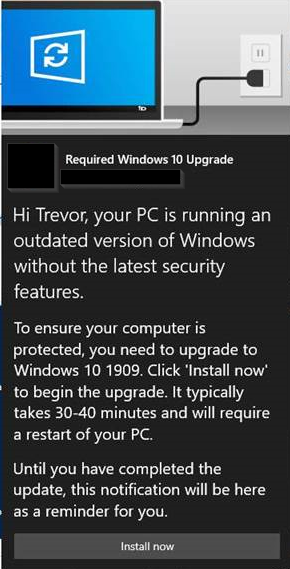
The update can be installed via a shortcut on the desktop, or in the last notification it can be initiated from the notification itself.
Once triggered, a custom UI is displayed introducing the user to the update and what to expect.
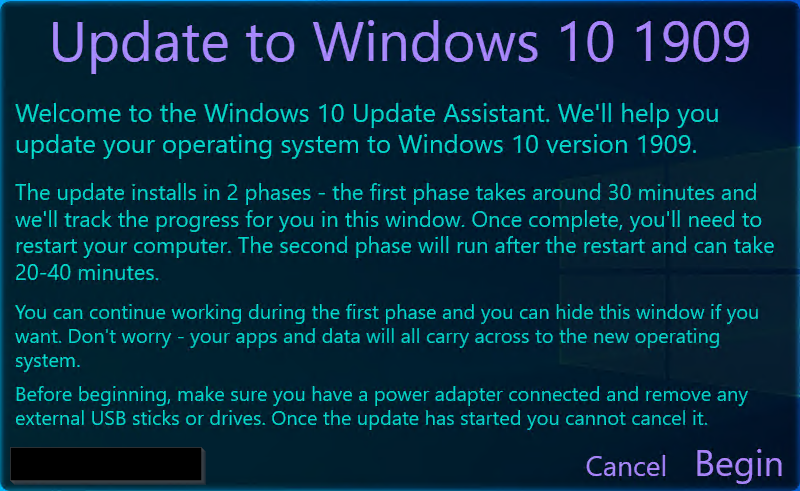
When the user clicks Begin, we check that a power adapter is connected and no removable USB devices are attached – if they are, we prompt to the user to remove them first.
The update runs in three phases or stages – these correspond to the PreDownload, Install and Finalize commands on the update (more on that later). The progress of each stage is polled from the registry, as is the Setup Phase and Setup SubPhase.


Note that the user cannot cancel the update once it starts and this window will remain on the screen and on top of all other windows until the update is complete. The user can click the Hide me button, and this will shrink the window like so:

This little window also cannot be removed from the screen, but it can be moved around and is small enough to be unobtrusive. When the update has finished installing, or when the user clicks Restore, the main window will automatically display again and report the result of the update.


The colour scheme is based on Google’s material design, by the way.
If the update failed during the online phase, the user can still initiate the update from the desktop shortcut but toast notifications will no longer display as reminders. The idea is that IT can attempt to remediate the device and run the update again after.
If successful, the user can click Restart to restart the computer immediately. Then the offline phase of the upgrade runs, where you see the usual light blue screen and white Windows update text reporting that updates are being installed.
Once complete, the user will be brought back to the login screen, and we won’t bother them anymore.
If the update rolled back during the offline phase, we will detect this next time they log in and notify them one time:

Logging and Reporting
The entire update process is logged right from the start to a log file on the local machine. We also send ‘status messages’ at key points during the process and these find their way to an Azure SQL database which becomes the source for reporting on update progress across the estate (more on this later).
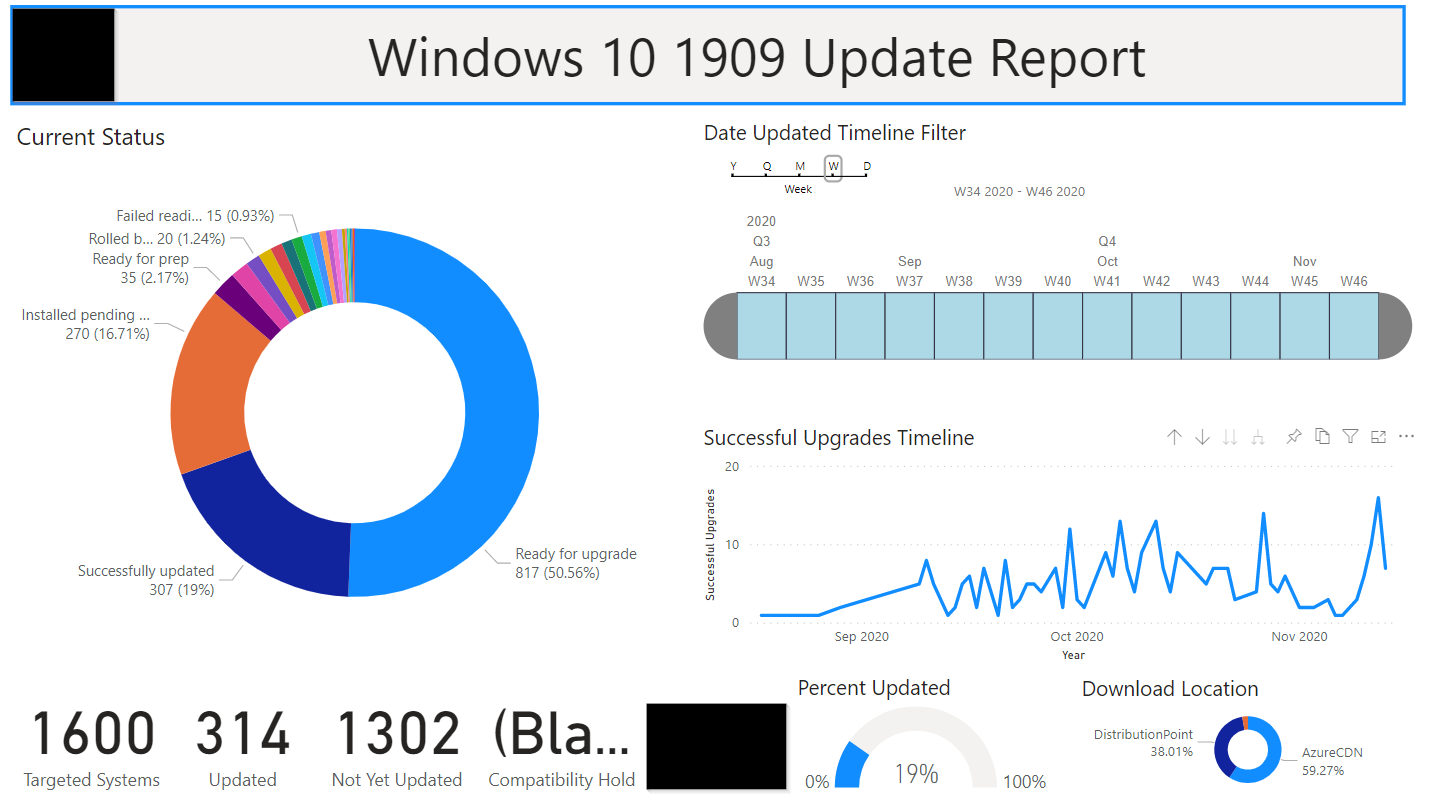
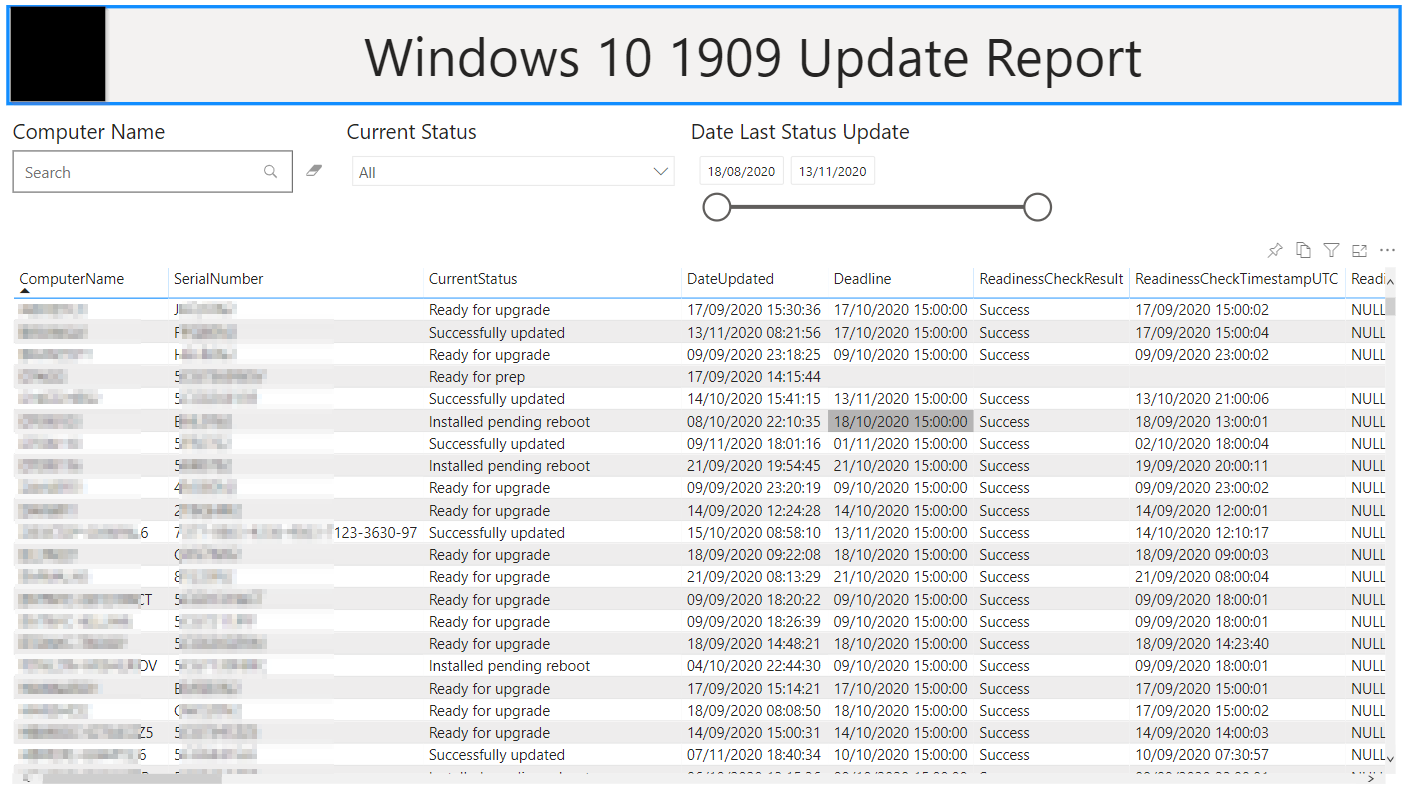
A PowerBI report gives visual indicators of update progress as well as a good amount of detail from each machine including update status, whether it passed or failed readiness checks and if failed, why, whether it passed the compatibility assessment, if it failed the assessment or the install we give the error code, whether any hard blocks were found, setup diag results (2004 onward), how long the update took to install and a bunch of other stuff we find useful.
Since 2004 though, we have starting inventorying certain registry keys using ConfigMgr to give us visibility of devices that won’t upgrade because of a Safeguard hold or other reason, so we can target the upgrade only to devices that aren’t reporting any known compatibility issues.
If a device performs a rollback, we can get it to upload key logs and registry key dumps to an Azure storage account where an administrator can remotely diagnose the issue.

How does it work?
Now lets dive into the process in more technical detail.
Deployment Script
The update starts life with a simple PowerShell script that does the following:
- Creates a local directory to use to cache content, scripts and logs etc
- Temporarily stores some domain credentials in the registry of the local SYSTEM account as encrypted secure strings for accessing content from a ConfigMgr distribution point if necessary (more on this later)
- Downloads a manifest file that contains a list of all files and file versions that need to be downloaded to run the update. These include scripts, dlls (for the UI), xml definition files for scheduled tasks etc
- Each file is then downloaded to the cache directory from an Azure CDN
- 3 scheduled tasks are then registered on the client:
- A ‘preparer’ task which runs prerequisite actions
- A ‘file updater’ task which keeps local files up-to-date in case we wish to change something
- A ‘content cleanup’ task which is responsible for cleaning up in the event the device gets upgraded through any means
- A ‘status message’ is then sent as an http request, creating a new record for the device in the Azure SQL database
This script can be deployed through any method you wish, including Configuration Manager, Intune or just manually, however it should be run in SYSTEM context.
Content
All content needed for the update process to run is put into a container in a storage account in Azure. This storage account is exposed via an Azure Content Delivery Network (CDN). This means that clients can get all the content they need directly from an internet location with minimal latency no matter where they are in the world.
Feature Update Files
The files for the feature update itself are the ESD file and WindowsUpdateBox.exe that Windows Update uses. You can get these files from Windows Update, WSUS, or as in our case, from Configuration Manager via WSUS. We simply download the feature updates to a deployment package in ConfigMgr and grab the content from there.
You could of course use an ISO image and run setup.exe, but the ESD files are somewhat smaller in size and are sufficient for purpose.
The ESD files are put into the Azure CDN so the client can download them from there, but we also allow the client the option to get the FU content from a local ConfigMgr distribution point if they are connected to the corporate network locally. Having this option allows considerably quicker content download. Since IIS on the distribution points is not open to anonymous authentication, we use the domain credentials stamped to the registry to access the DP and download the content directly from IIS (credentials are cleaned from the registry after use).
Status Messages
Similar to how ConfigMgr sends status message to a management point, this solution also send status messages at key points during the process. This works by using Azure Event Grid to receive the message sent from the client as an http request. The Event Grid sends the message to an Azure Function, and the Azure Function is responsible to update the Azure SQL database created for this purpose with the current upgrade status of the device. The reason for doing it this way is that sending an http request to Event Grid is very quick and doesn’t hold up the process. Event Grid forwards the message to the Azure Function and can retry the message in the case it can’t get through immediately (although I’ve never experienced any failures or dead-lettering in practice). The Azure Function uses a Managed Identity to access the SQL database, which means the SQL database never needs to be exposed outside of its sandbox in Azure, and no credentials are needed to update the database.
We then use PowerBI to report on the data in the database to give visibility of where in the process every device is, if there are any issues that need addressing and all the stats that are useful for understanding whether devices get content from Azure or a local DP, what their approximate bandwidth is, how long downloads took, whether they were wired or wireless, make and model, upgrade time etc.
Preparation Script
After the initial deployment script has run, the entire upgrade process is driven by scheduled tasks on the client. The first task to run is the Preparation script and this attempts to run every hour until successful completion. This script does the following things:
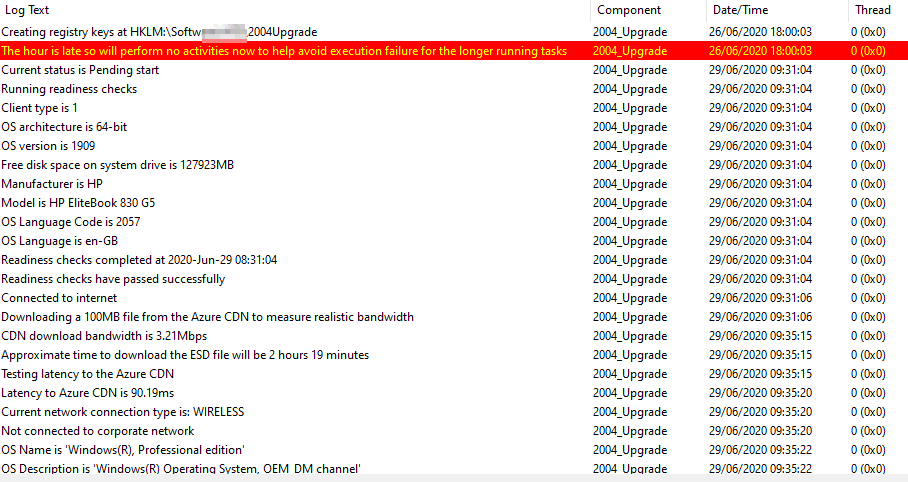
- Create the registry keys for the upgrade. These keys are stamped with the update progress and the results of the various actions such as pre-req checks, downloads etc. When we send a ‘status message’ we simply read these keys and send them on. Having progress stamped in the local registry is useful if we need to troubleshoot on the device directly.
- Run readiness checks, such as
- Checking for client OS
- Checking disk space
- Check for internet connectivity
- Determine the approximate bandwidth to the Azure CDN and measure latency. This is done by downloading a 100MB file from the CDN and timing the download and using ‘psping.exe’ to measure latency. From this, we can calculate an approximate download time for the main ESD file.
- Determine if the device is connected by wire or wireless
- Determine if the device is connected to the corporate network
- If the device is on the corporate network, we check latency to all the ConfigMgr distribution points to determine which one will be the best DP to get content from
- Determine whether OS is business or consumer and which language. This helps us figure out which ESD file to use.
- Download WindowsUpdateBox.exe and verify the hash
- Download the feature update ESD file and verify the hash
- Downloads of FU content is done using BITS transfers as this proved the most reliable method. Code is added to handle BITS transfer errors to add resilience.
- Assuming all the above is done successfully, the Preparation task will be disabled and the PreDownload task created.
PreDownload Script
The purpose of this script is to run the equivalent of a compatibility assessment. When using the ESD file, this is done with the /PreDownload switch on WindowsUpdateBox.exe. Should the PreDownload fail, the error code will be logged to the registry. Since 2004, we also read the SetupDiag results and stamp these to the registry. We also check the Compat*.xml files to look for any hard blocks and if found, we log the details to the registry.
If the PreDownload failed, we change the schedule of the task to run twice a week. This allows for remediation to be performed on the device before attempting the PreDownload assessment again.
If the PreDownload succeeds, we disable the PreDownload task and create two new ones – a Notification task and an Upgrade task.
We also create a desktop shortcut that the user can use to initiate the upgrade.
Notification Script
The Notification script runs in the user context and displays toast notifications to notify the user that the upgrade is available, what the deadline is and how to upgrade, as already mentioned.
Upgrade Script
When the user clicks the desktop shortcut or the ‘Install now’ button on the toast notification, the upgrade is initiated. Because the upgrade needs to run with administrative privilege, the only thing the desktop shortcut and toast notification button does is to create an entry in the Application event log. The upgrade scheduled task is triggered when this event is created and the task runs in SYSTEM context. The UI is displayed in the user session with the help of the handy ServiceUI.exe from the MDT toolkit.
Upgrade UI
The user interface part of the upgrade is essentially a WPF application coded in PowerShell. The UI displays some basic upgrade information for the user and once they click ‘Begin’ we run the upgrade in 3 stages:
- PreDownload. Even though we ran this already, we run again before installing just to make sure nothing has changed since, and it doesn’t take long to run.
- Install. This uses the /Install switch on WindowsUpdateBox.exe and runs the main part of the online phase of the upgrade.
- Finalize. This uses the /Finalize switch and finalizes the update in preparation for a computer restart.
The progress of each of these phases is tracked in the registry and displayed in the UI using progress bars. If there is an issue, we notify the user and IT can get involved to remediate.
If successful, the user can restart the computer immediately or a later point (though we discourage this!). We don’t stop the user from working while the upgrade is running in the online phase and we allow them to partially hide the upgrade window so the upgrade does not hinder user productivity (similar to how WUfB installs an update in the background.)
After the user restarts the computer, the usual Windows Update screens take over until the update has installed and the user is brought to the login screen again.
Drivers and Stuff
We had considered upgrading drivers and even apps with this process, as we did for the 1903 upgrade, however user experience was important for us and we didn’t want the upgrade to take any longer than necessary, so we decided not to chain anything onto the upgrade process itself but handle other things separately. That being said, because this is a custom solution it is perfectly possible to incorporate additional activities into it if desired.
Rollback
In the event the that OS was rolled back during the offline phase, a scheduled task will run that will detect this and raise a toast notification to inform the user. We have a script that will gather logs and data from the device and upload it to a storage account in Azure where an administrator can remotely diagnose the issue. I plan to incorporate that as an automatic part of the process in a future version.
Updater Script
The solution creates an Updater scheduled task which runs once per day. The purpose of this task is to keep the solution up to date. If we want to change something in the process, add some code to a file or whatever is necessary, the Updater will take care of this.
It works by downloading a manifest file from the Azure CDN. This file contains all the files used by the solution with their current versions. If we update something, we upload the new files to the Azure storage account, purge them from the CDN and update the manifest file.
The Updater script will download the current manifest, detect that something has changed and download the required files to the device.
Cleanup Script
A Cleanup task is also created. When this task detects that the OS has been upgraded to the required version, it will remove all the scheduled tasks and cached content to leave no footprint on the device other than the log file and the registry keys.
Source Files
You can find a generalised version of the code used in this solution in my Github repo as a reference. As mentioned before though, there are many working parts to the solution including the Azure services and I haven’t documented their configuration here.
Final Comments
The main benefit of this solution for us is that it is completely customised to our needs. Although it is relatively complex to create, it is also relatively easy to maintain as well as adapt the solution for new W10 versions. We do still take advantage of products like ConfigMgr to allow devices to get content from a local DP if they are corporate connected, and ConfigMgr / Update Compliance / Desktop Analytics for helping us determine device compatibility and ConfigMgr or Intune to actually get the deployment script to the device. We also make good use of Azure services for the status messages and the cloud database, as well as PowerBI for reporting. So the solution still utilizes existing Microsoft products while giving us the control and customisations that we need to provide a better upgrade experience for our users.