The Intune Data Warehouse is a great addition to the Microsoft Intune service allowing visibility of historical data for reporting, data and trend analysis for your Microsoft MDM environment. It comes with an OData feed that allows you to connect to the data with PowerBI, Microsoft’s reporting and data visualization service.
The Data Warehouse RESTful API (currently in Beta) can be used to get data from the warehouse using a REST client. I decided to explore how to do this with PowerShell so I can run some ad-hoc queries and analyse trends in the data.
To get data from the Intune Data Warehouse we need to do three main things:
- Create a native App in Azure and give it access to the Intune Data Warehouse
- Authenticate with Azure using OAuth 2.0 and get an access token
- Invoke the RESTful web service using http
Create a Native App in Azure
In your Azure portal, go to Azure Active Directory > App registrations. Click New application registration.
Give it a name, make sure it is a Native app (do not use Web app / API) and use the redirect URI https://login.live.com/oauth20_desktop.srf .

Click Create.
Once created, make a note of the Application ID as we will need this later.
Now, in the App in the Settings blade, click Required permissions > Add > Select an API and select Microsoft Intune API.
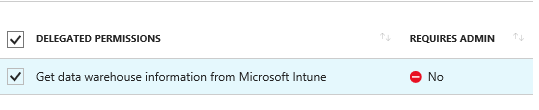
In the Add API access blade click Select permissions and grant the delegated permission Get data warehouse information from Microsoft Intune.
Save your changes.
Authenticate with Azure
To authenticate with Azure I wrote the following function in PowerShell:
This file contains hidden or bidirectional Unicode text that may be interpreted or compiled differently than what appears below. To review, open the file in an editor that reveals hidden Unicode characters.
Learn more about bidirectional Unicode characters
| Function New-IntuneDataWarehouseAccessToken { | |
| # Function to get an access token for the Intune Data Warehouse | |
| # To be used in conjunction with the function Get-IntuneDataWarehouseData | |
| # Will download NuGet if required to install the latest Active Directory Authentication Library package | |
| [CmdletBinding()] | |
| Param( | |
| [Parameter()] | |
| $NuGetDirectory = "$Env:USERPROFILE\NuGet", | |
| [Parameter()] | |
| $RedirectURL = "https://login.live.com/oauth20_desktop.srf", # this is the RedirectURL of your InTune Data Warehouse Native app in Azure | |
| [Parameter()] | |
| $ClientID = "8d0d82ed-f664-4b38-93d8-75ad70165832" # this is the application ID of your InTune Data Warehouse Native app in Azure | |
| ) | |
| # Create a NuGet directory in UserProfile area if the supplied path does not exist | |
| If (!(Test-Path $NuGetDirectory)) | |
| { | |
| $null = New-Item -Path $Env:USERPROFILE -Name NuGet -ItemType directory | |
| $NuGetDirectory = "$Env:USERPROFILE\NuGet" | |
| } | |
| # Check whether a NuGet Directory exists and if the Microsoft.IdentityModel.Clients.ActiveDirectory package is in there | |
| # If not, do the needful | |
| If ((Get-ChildItem $NuGetDirectory -Directory).Name -notmatch "Microsoft.IdentityModel.Clients.ActiveDirectory") | |
| { | |
| # Download NuGet to UserProfile and create a temporary alias | |
| $sourceNugetExe = "https://dist.nuget.org/win-x86-commandline/latest/nuget.exe" | |
| $targetNugetExe = "$NuGetDirectory\nuget.exe" | |
| Invoke-WebRequest $sourceNugetExe -OutFile $targetNugetExe | |
| Set-Alias nuget $targetNugetExe -Scope Script | |
| # Download the latest Active Directory Authentication Library package | |
| nuget install Microsoft.IdentityModel.Clients.ActiveDirectory -OutputDirectory $NuGetDirectory | |
| } | |
| # Add the ADAL library | |
| $DLLPath = "$Env:USERPROFILE\NuGet\" + "$((Get-ChildItem $env:USERPROFILE\NuGet -Filter "Microsoft.IdentityModel.Clients.ActiveDirectory*" | Sort Name -Descending | Select -First 1).Name)" + "\lib\net45" | |
| Add-Type -Path "$DLLPath\Microsoft.IdentityModel.Clients.ActiveDirectory.dll" | |
| # Create the authentication context | |
| $AuthenticationContext = New-Object Microsoft.IdentityModel.Clients.ActiveDirectory.AuthenticationContext("https://login.windows.net/common/oauth2/authorize") | |
| # Get Access Token for the user | |
| $Resource = "https://api.manage.microsoft.com/" | |
| $PlatformParams = New-Object Microsoft.IdentityModel.Clients.ActiveDirectory.PlatformParameters("Auto") | |
| $Result = $AuthenticationContext.AcquireTokenAsync($Resource,$clientID,$RedirectURL,$PlatformParams).Result | |
| $script:AccessToken = $Result.AccessToken | |
| Return "Your access token expires at $($Result.ExpiresOn.DateTime)" | |
| } |
What the code does…
To authenticate with Azure we need to use the Active Directory Authentication Library from Microsoft. This library is actually included in resources like the ConfigMgr client and the AzureRM PowerShell module, but these do not have the latest versions of the library and the methods it contains have changed over time. So I prefer to use the latest version of the library (3.17.2 at the time of writing) which is available as a NuGet package.
The function will download NuGet and use it to download the latest version of the ADAL library to your user profile area. Once we have the library we will add it in PowerShell. Then we will acquire an access token.
The access token expires after an hour so once created, the token will probably be good for your current session. If it expires, simply run the function again. The access token will be saved to a variable in the script scope and will be used by the function that queries the data warehouse.
How to use it…
Make sure the following parameters contain the required values. I recommend that you store those in the function directly so you don’t have to add them every time.
- RedirectURL: Must be the same as the RedirectURI you added to the native app in Azure, ie https://login.live.com/oauth20_desktop.srf
- ClientID: this is the Application ID from your Azure native app
Simply run the function:
New-IntuneDataWarehouseAccessToken
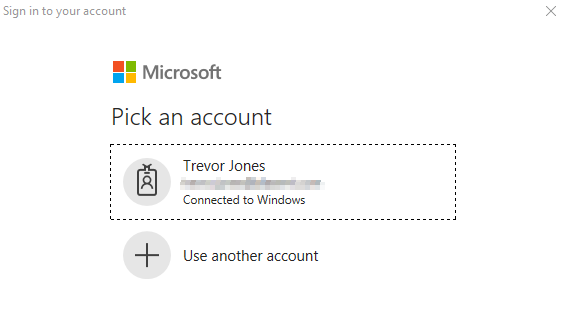
If you have not previously authenticated with Azure in your current session you will be prompted to sign in to your Azure account:
The first time you use the native app you created, you will also be prompted for permission:

Invoke the Web Service using the OData feed
Now that we have an access token, we can invoke the web service using http. I wrote the following PowerShell function to do that:
This file contains hidden or bidirectional Unicode text that may be interpreted or compiled differently than what appears below. To review, open the file in an editor that reveals hidden Unicode characters.
Learn more about bidirectional Unicode characters
| Function Get-IntuneDataWarehouseData { | |
| # Function to query the Intune Data Warehouse for data | |
| # Requires an access token to be created first via the New-IntuneDataWarehouseAccessToken function | |
| [CmdletBinding()] | |
| Param( | |
| [Parameter()] # this is the custom feed URL for your for your tenant for the InTune Data Warehouse | |
| $WarehouseUrl = "https://fef.msun02.manage.microsoft.com/ReportingService/DataWarehouseFEService?api-version=beta", | |
| [Parameter()] | |
| $DataEntity = "devices", # this is the Data Entity you wish to query | |
| [Parameter()] | |
| $Filter, # OData Query parameter | |
| [Parameter()] | |
| $Top, # OData Query parameter | |
| [Parameter()] | |
| $OrderBy, # OData Query parameter | |
| [Parameter()] | |
| $Select, # OData Query parameter | |
| [Parameter()] | |
| $Skip, # OData Query parameter | |
| [Parameter()][Switch] | |
| $ListDataEntities # Use this switch to list the available data entities | |
| ) | |
| # Create the custom URL | |
| $UriBuilder = new-object System.UriBuilder($warehouseUrl) | |
| If ($ListDataEntities) | |
| { | |
| $UriBuilder = new-object System.UriBuilder($WarehouseUrl) | |
| } | |
| Else | |
| { | |
| $URI = $WarehouseUrl.Insert($WarehouseUrl.IndexOf("?"), "/$DataEntity") | |
| # Add query parameters | |
| If ($filter -ne $null) | |
| { | |
| $URI = "$URI&`$filter=$Filter" | |
| } | |
| If ($select -ne $null) | |
| { | |
| $URI = "$URI&`$select=$select" | |
| } | |
| If ($top -ne $null) | |
| { | |
| $URI = "$URI&`$top=$top" | |
| } | |
| If ($orderby -ne $null) | |
| { | |
| $URI = "$URI&`$orderby=$orderby" | |
| } | |
| If ($skip -ne $null) | |
| { | |
| $URI = "$URI&`$skip=$skip" | |
| } | |
| $UriBuilder = new-object System.UriBuilder($URI) | |
| } | |
| # Create an HttpClient | |
| $HttpClient = New-Object System.Net.Http.HttpClient | |
| $HttpClient.Timeout = [timespan]"00:10:00" # Extend the timeout to 10 minutes in case of slow network / high data volume | |
| $HttpClient.DefaultRequestHeaders.Authorization = New-Object System.Net.Http.Headers.AuthenticationHeaderValue("Bearer", $AccessToken) | |
| # Load the data | |
| $Result = (($httpClient.GetAsync($uriBuilder.Uri).Result).Content.ReadAsStringAsync().Result | ConvertFrom-Json).Value | |
| If ($ListDataEntities) | |
| { | |
| $Result = $Result.URL | Sort | |
| } | |
| $HttpClient.Dispose() | |
| return $Result | |
| } |
What the code does…
The function uses the custom OData feed URL for your tenant, creates an http client to invoke the web service and gets data for the data entity (ie collection, or table) that you specify. The results are then returned to the PowerShell console.
You can read more about the data model for the warehouse and get a reference for the various data entities and their relationships on the Microsoft Docs site.
How to use it…
Make sure the following parameter is set in the function:
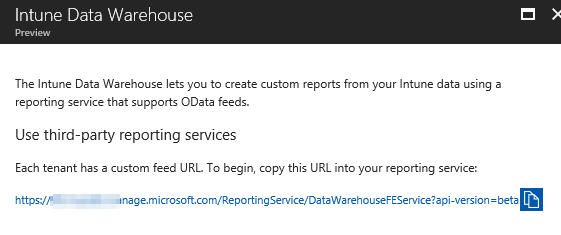
- WarehouseUrl
This Url is the custom feed URL for your tenant and you can find it from the Intune blade in Azure. On the Overview blade, on the right you find Other tasks and underneath Set up Intune Data Warehouse.
To list the data entities that are available to query use the ListDataEntities switch:
Get-IntuneDataWarehouseData -ListDataEntities

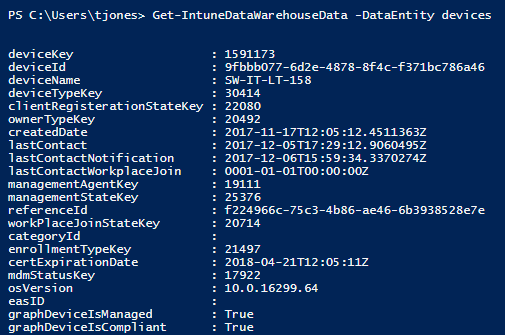
To return the data from a specific data entity, use the DataEntity parameter. This example returns data from the devices table.
Get-IntuneDataWarehouseData -DataEntity devices
Working with the Data
The API supports a few query parameters in the OData protocol v4.0, so rather than returning all the results in the data entity, you can narrow them down. However, I have noticed that the query parameters do not always work as expected when they are combined, at least in the beta version of the API.
For example, you can use the Filter parameter to return only matching results. This query finds a specific device:
Get-IntuneDataWarehouseData -DataEntity devices -Filter "deviceName eq 'SW-IT-LT-AZURE1'"
You can select only specific properties to be returned in the results using the Select parameter:
Get-IntuneDataWarehouseData -DataEntity devices -Select 'deviceName,serialNumber,lastContact'
Select the top 5 results:
Get-IntuneDataWarehouseData -DataEntity devices -Top 5
Skip 10 results and return the rest:
Get-IntuneDataWarehouseData -DataEntity devices -Skip 10
Sort results by a particular property:
Get-IntuneDataWarehouseData -DataEntity devices -OrderBy 'lastContact'
You can learn more about how to use query parameters in the OData protocol from the Microsoft Developer site for the Graph API.
These query parameters are certainly helpful, but for relational queries where you want to reference more than one table or entity, the API comes short and more complex Powershell code is required.
For example, here I am searching for the ethernet MAC address from the most recent hardware inventory for a device, and even with query parameters applied I still need to do some filtering and sorting in Powershell. Remember that the data warehouse only contains snapshots of historic data, so for current data you can use the Graph API instead, but this is just for an example.
$DeviceName = "SW-IT-LT-AZURE1"
Get-IntuneDataWarehouseData -DataEntity 'mdmDeviceInventoryHistories' -Select 'deviceKey,datekey,ethernetMac' |
    Where {$_.devicekey -eq ((Get-IntuneDataWarehouseData -DataEntity 'devices' -Filter "deviceName eq '$DeviceName'").devicekey)} |
    Sort datekey -Descending |
    Select -First 1 |
    Select -ExpandProperty ethernetMac
This code takes a while to run however because it’s querying the data warehouse more than once to get the data. Another way to do this would be to first load the required device entities into memory, then I can query them more quickly and run other queries from this cached data.
The following code will load just those two entities into a hash table:
$DataEntities = "mdmDeviceInventoryHistories","devices"
$DataHash = @{}
foreach ($DataEntity in $DataEntities)
{
    Write-host "Loading $DataEntity"
    [void]$DataHash.Add($DataEntity,(Get-IntuneDataWarehouseData -DataEntity $DataEntity))
}
Then I can run the following code to get the ethernet MAC address and it returns the result instantly:
$DeviceName = "SW-IT-LT-AZURE1"
$DataHash['mdmDeviceInventoryHistories'] |
    Where {$_.devicekey -eq (($DataHash['devices'] | where {$_.deviceName -eq $DeviceName}).devicekey)} |
    Sort datekey -Descending |
    Select -First 1 |
    Select -ExpandProperty ethernetMac
You could load the entire data warehouse into memory using the following code, then you can simply work with the resultant hashtable:
$DataEntities = Get-IntuneDataWarehouseData -ListDataEntities
$DataHash = @{}
foreach ($DataEntity in $DataEntities)
{
    Write-host "Loading $DataEntity"
    [void]$DataHash.Add($DataEntity,(Get-IntuneDataWarehouseData -DataEntity $DataEntity))
}
The benefit of a data warehouse of course is that you can review snapshots of data over a period of time and analyse the data for trends or identify when things changed. The following example is using the data hashtable and is reporting the device inventory history of a specific device over time. The Intune data warehouse keeps up to 90 days of historic data. In particular, I want to see how much the free space on disk is changing over time.
$DeviceName = "SW-IT-LT-158"
$Results = $DataHash['mdmDeviceInventoryHistories'] |
Where {$_.devicekey -eq (($DataHash['devices'] | where {$_.deviceName -eq $DeviceName}).devicekey)} |
Sort datekey -Descending |
Select dateKey, deviceName,
softwareVersion,
@{e={$([math]::Round(($_.storageFree / 1GB),2))};l="storageFree (GB)"},
@{e={$([math]::Round(($_.storageTotal / 1GB),2))};l="storageTotal (GB)"}
foreach ($Result in $results){
$Result | Add-Member -MemberType NoteProperty -Name date -Value (($DataHash['dates'] | Where {$_.dateKey -eq $Result.dateKey}).fullDate | Get-Date -Format "dd MMM yyyy")
}
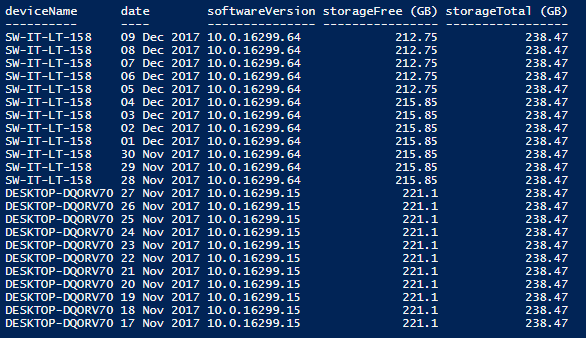
$Results | Select deviceName,date,softwareVersion,'storageFree (GB)','storageTotal (GB)' | ft
You can readily see that it’s necessary to manipulate the data quite a bit to get the results I want to see, for example in order to do something equivalent to a ‘join’ in SQL I am using Where-Object, and in order to add the data from another table to my results I am using Add-Member. I am also converting the values of the storage data into GB and formatting the date using the UK short date code.
The results are returned in an array object, but for data like this it can also be useful to use a datatable as you would for SQL data for example. Then you can add / remove columns, change column order, set the datatype for a column, change headers etc.
This code does exactly the same thing as the last example, but using a datatable for the results.
$DeviceName = "sw-it-lt-158"
$Datatable = New-Object System.Data.DataTable
[void]$Datatable.Columns.AddRange(@('deviceName','date','softwareVersion','storageFree (GB)','storageTotal (GB)'))
$Results = $DataHash['mdmDeviceInventoryHistories'] |
    Where {$_.devicekey -eq (($DataHash['devices'] | where {$_.deviceName -eq $DeviceName}).devicekey)} |
    Sort datekey -Descending |
    Select dateKey,
        deviceName,
        softwareVersion,
        @{e={$([math]::Round(($_.storageFree / 1GB),2))};l="storageFree (GB)"},
        @{e={$([math]::Round(($_.storageTotal / 1GB),2))};l="storageTotal (GB)"}
foreach ($Result in $results){
    [datetime]$Date = ($DataHash['dates'] | Where {$_.dateKey -eq $Result.dateKey}).fullDate
    [void]$DataTable.Rows.Add($Result.deviceName,$Date.ToShortDateString(),$Result.softwareVersion,$Result.'storageFree (GB)', $Result.'storageTotal (GB)')
}
$Datatable | ft
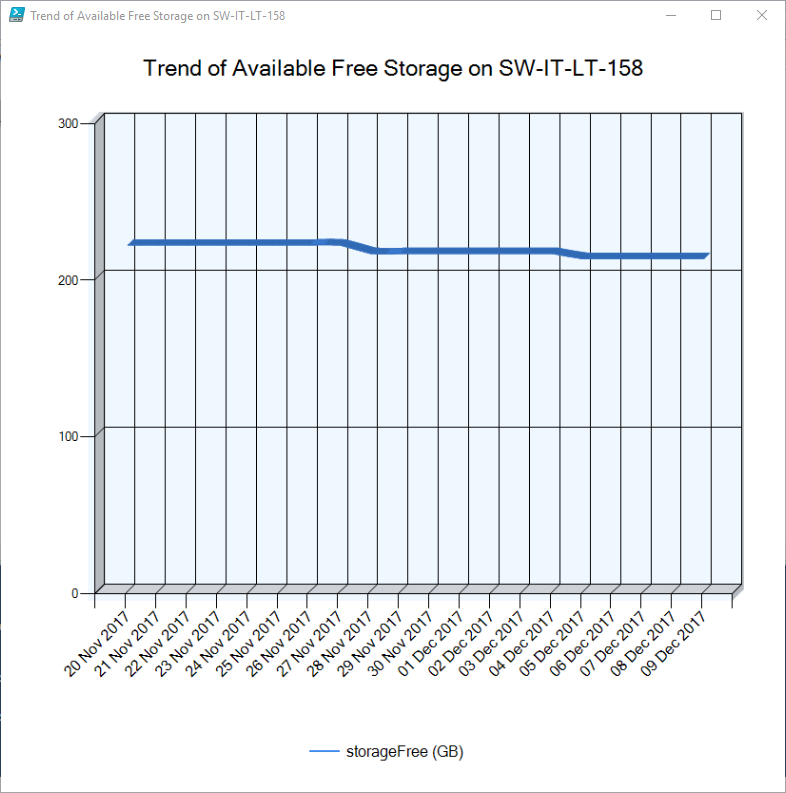
Reviewing the results I can see that the available disk space is decreasing slightly over time. It would be nice to see that data represented graphically, and of course this is where the integration with PowerBI will shine, but we can also generate graphical charts in Powershell, so let’s give that a go.
Here is a function I wrote that will generate a spline chart using the .Net chart controls and display it in a WPF window. It takes a single series of data and you need to provide a title, a data object as an array, the X and Y axis names (which must match the header names in the data object).
This file contains hidden or bidirectional Unicode text that may be interpreted or compiled differently than what appears below. To review, open the file in an editor that reveals hidden Unicode characters.
Learn more about bidirectional Unicode characters
| Function New-SingleSeriesSplineChart { | |
| [CmdletBinding()] | |
| Param( | |
| [Parameter(Mandatory=$true)] | |
| $Title, | |
| [Parameter(Mandatory=$true)] | |
| $Data, | |
| [Parameter(Mandatory=$true)] | |
| $AxisX, | |
| [Parameter(Mandatory=$true)] | |
| $AxisY | |
| ) | |
| # Add required assemblies | |
| Add-Type -AssemblyName PresentationFramework,System.Windows.Forms,System.Windows.Forms.DataVisualization | |
| # Create a WPF Window | |
| $Window = New-object System.Windows.Window | |
| $Window.Title = $Title | |
| $window.Height = 800 | |
| $Window.Width = 800 | |
| $Window.WindowStartupLocation = "CenterScreen" | |
| # Add an image to the Window | |
| $Image = New-Object System.Windows.Controls.Image | |
| $Image.Height = "NaN" | |
| $Image.Width = "NaN" | |
| $Window.AddChild($Image) | |
| # Function to create a .Net Spline Chart | |
| Function Create-SplineChart { | |
| param($Title,$Data,$AxisX,$AxisY) | |
| # Create a chart object | |
| $Chart = New-object System.Windows.Forms.DataVisualization.Charting.Chart | |
| $Chart.Width = 800 | |
| $Chart.Height = 800 | |
| $Chart.Left = 10 | |
| $Chart.Top = 10 | |
| # Create a chartarea to draw on and add this to the chart | |
| $ChartArea = New-Object System.Windows.Forms.DataVisualization.Charting.ChartArea | |
| $ChartArea.AxisY.Minimum = 0 | |
| $ChartArea.AxisX.Minimum = 0 | |
| $ChartArea.AxisX.Interval = 1 | |
| $ChartArea.AxisX.IsLabelAutoFit = $false | |
| $ChartArea.AxisX.LabelStyle.Angle = -45 | |
| $ChartArea.Area3DStyle.Enable3D = $True | |
| $ChartArea.Area3DStyle.Inclination = "10" | |
| $ChartArea.Area3DStyle.Rotation = "10" | |
| $ChartArea.BackColor = "AliceBlue" | |
| $ChartArea.AxisX.LabelStyle.Font = (New-Object System.Drawing.Font -ArgumentList "Segui", "12") | |
| $Chart.ChartAreas.Add($ChartArea) | |
| [void]$Chart.Series.Add($AxisY) | |
| # Add a legend | |
| $Legend = New-Object System.Windows.Forms.DataVisualization.Charting.Legend | |
| $Chart.Legends.Add($Legend) | |
| $Chart.Legends[0].Docking = "Bottom" | |
| $Chart.Legends[0].Font = (New-Object System.Drawing.Font -ArgumentList "Segui", "12") | |
| $Chart.Legends[0].Alignment = "Center" | |
| # Add a datapoint for each value specified in the provided data | |
| $Data | foreach { | |
| $datapoint = new-object System.Windows.Forms.DataVisualization.Charting.DataPoint(0, $_.$AxisY) | |
| $datapoint.AxisLabel = $_.$AxisX | |
| $Chart.Series[$AxisY].Points.Add($datapoint) | |
| } | |
| # Set the chart type | |
| $Chart.Series[$AxisY].ChartType = [System.Windows.Forms.DataVisualization.Charting.SeriesChartType]::Spline | |
| # Set the title of the Chart | |
| $TitleObj = new-object System.Windows.Forms.DataVisualization.Charting.Title | |
| $Chart.Titles.Add($TitleObj) | |
| $Chart.Titles[0].Font = (New-Object System.Drawing.Font -ArgumentList "Segui", "18") | |
| $Chart.Titles[0].Text = $Title | |
| # Save the chart to a memory stream | |
| $Stream = New-Object System.IO.MemoryStream | |
| $Chart.SaveImage($Stream,"png") | |
| $script:ImageStream = $Stream.GetBuffer() | |
| $Stream.Dispose() | |
| } | |
| # Add an event to display the chart when the window is opened | |
| $Window.Add_ContentRendered({ | |
| # Create the Chart | |
| Create-SplineChart -Title $Title -Data $Data -AxisX $AxisX -AxisY $AxisY | |
| # Set the image source | |
| $image.Source = $ImageStream | |
| $This.Activate() | |
| }) | |
| # Display window | |
| $null = $window.Dispatcher.InvokeAsync{$window.ShowDialog()}.Wait() | |
| } |
To generate the chart, I will use the results from my previous example (not the datatable but the array), sort them by date, select the last 20 data snapshots, select the X and Y axis data into a new object and provide this to the chart function:
$Data = $Results | Sort dateKey | Select date,'storageFree (GB)' | Select -Last 20
New-SingleSeriesSplineChart -Title "Trend of Available Free Storage on SW-IT-LT-158" -Data $Data -AxisX "date" -AxisY "storageFree (GB)"
Now I have a nice graphical view 🙂
I have focused just on devices in this blog, but there is lots of data available in the Intune Data Warehouse including users, policies, compliance, configurations, MAM data etc, all of which can provide valuable insights into your MDM estate and whether you use PowerShell, PowerBI, Excel or whichever tool, the ability to view and analyse historic data is a welcome improvement to the ever-evolving Intune service.
One thought on “Getting Data from the Intune Data Warehouse with PowerShell”