Any security-conscious enterprise will want to have visibility of which users have local administrator privilege on any given system, and if you are an SCCM administrator then the job of gathering this information will likely be handed to you!
However, this task may not be as simple as it seems. Gathering the membership of the local administrators group is one thing, but perhaps more important to know is whether the primary user of a system has administrator privileges. If that user is a member of a group that has been added to the local administrators group, then it isn’t immediately obvious whether they actually have administrator rights without also checking the membership of that group. And what if there are further nested groups – ie the user is a member of a group that’s a member of a group that’s a member of the local administrators group?! Obviously things can get complicated here, making reporting and compliance checking a challenge.
Thankfully, PowerShell can handle complication quite nicely, and ConfigMgr is more than capable as a both a delivery vehicle and a reporting mechanism, so the good news is – we can do this!
The following solution uses PowerShell to gather local administrator information and stamp it to the local registry. A Compliance item in SCCM is used as the delivery vehicle for the script and then RegKeyToMof is used to update the hardware inventory classes in SCCM to gather this information from the client’s registry into the SCCM database, where we can query and report on it.
Gathering Local Administrator Information with PowerShell
To start with, let’s have a look at some of the PowerShell code and the information we will gather with it.
First, we need to identify who is the primary user of the system. Since the script is running locally on the client computer, we will not use User Device Affinity. True, UDA information is stored in WMI in the CCM_UserAffinity class, in the ROOT\CCM\Policy\Machine\ActualConfig namespace. But this class can contain multiple instances so you can’t always determine the primary user that way.
A better way is to use the SMS_SystemConsoleUsage class in the ROOT\cimv2\sms namespace and query the TopConsoleUser property. This will give you the user account who has had the most interactive logons on the system and for the most part will indicate who the primary user is.
$TopConsoleUser = Get-WmiObject -Namespace ROOT\cimv2\sms -Class SMS_SystemConsoleUsage -Property TopConsoleUser -ErrorAction Stop | Select -ExpandProperty TopConsoleUser
Next, to find if the user is a local admin or not, we will not simply query the local administrator group membership and check if the user is in there. Instead we will create a WindowsIdentity object in .Net and run a method called HasClaim(). I describe this more in a previous blog, but using this method we can determine if the user has local administrator privilege whether through direct membership or through a nested group.
$ID = New-Object Security.Principal.WindowsIdentity -ArgumentList $TopConsoleUser
$IsLocalAdmin = $ID.HasClaim('http://schemas.microsoft.com/ws/2008/06/identity/claims/groupsid','S-1-5-32-544')
$ID.Dispose()
The SID for the local admin group (S-1-5-32-544) is used as this is the same across all systems. This will only work for domain accounts as it uses kerberos to create the identity.
Now we will also get the local administrator group membership using the following code (more .Net stuff), and filter just the SamAccountNames.
Add-Type -AssemblyName System.DirectoryServices.AccountManagement -ErrorAction Stop
$ContextType = [System.DirectoryServices.AccountManagement.ContextType]::Machine
$PrincipalContext = New-Object -TypeName System.DirectoryServices.AccountManagement.PrincipalContext -ArgumentList $ContextType, $($env:COMPUTERNAME) -ErrorAction Stop
$IdentityType = [System.DirectoryServices.AccountManagement.IdentityType]::Name
$GroupPrincipal = [System.DirectoryServices.AccountManagement.GroupPrincipal]::FindByIdentity($PrincipalContext, $IdentityType, “Administrators”)
$LocalAdminMembers = $GroupPrincipal.Members | select -ExpandProperty SamAccountName | Sort-Object
$PrincipalContext.Dispose()
$GroupPrincipal.Dispose()
Next, if the user is a local admin through nested group membership, I will call a custom function which will check the nested group membership within the local admin group, for the user account. Let’s say that Group B is a member of Group A, which is a member of the local administrators group. We will check the membership of both Groups B and A to see which ones the user is a member of, and therefore which group/s is effectively giving the user administrator privilege. We do this by querying the $GroupPrincipal object created in the previous code. The custom function will query nested membership up to 3 levels deep.
Now I will query the Install Date for the operating system, since in some cases where a machine is newly built, the TopConsoleUser may not yet be the primary user of the system, but the admin who built the machine, for example. This date helps to identify any such systems.
[datetime]$InstallDate = [System.Management.ManagementDateTimeConverter]::ToDateTime($(Get-WmiObject win32_OperatingSystem -Property InstallDate -ErrorAction Stop | Select -ExpandProperty InstallDate)) | Get-date -Format 'yyyy-MM-dd HH:mm:ss'
Now we gather all this information into a datatable, and call another custom function to write it to the local registry. I use the following registry key, but you can change this in the script if you wish:
HKLM:SOFTWARE\IT_Local\LocalAdminInfo
The script will create the key if it doesn’t exist.
Here’s an example of the kind of data that will be gathered:

You can see in this example, that my user account is a local administrator both by direct membership and through nested groups. The actual groups that grant this right are listed in the NestedGroupMembership property.
Create a Compliance Item
Now lets go ahead and create a compliance item in SCCM to run this script.
In the Console, navigate Assets and Compliance > Compliance Settings > Configuration Items.
Click Create Configuration Item

Click Next and select which OS’s you will target. Remember the Windows XP and Server 2003 may not have PowerShell installed.
Click Next again, then click New to create a new setting.
Choose Script as the setting type, and String as the data type.

Now we need to add the scripts. You can download both the discovery and remediation scripts from my Github repo here:
Click Add Script and paste or open the relevant script for each. Make sure Windows Powershell is selected as the script language.
The discovery script simply checks whether the script has been run in the last 15 minutes, and if not returns non-compliant. This allows the script to run according to the schedule you define for it, ie once a day or once a week etc, to keep the information up-to-date in the registry.
The remediation script does the hard work 🙂
Click OK to close the Create Setting window.
Click Next, then click New to create a new Compliance Rule as follows:
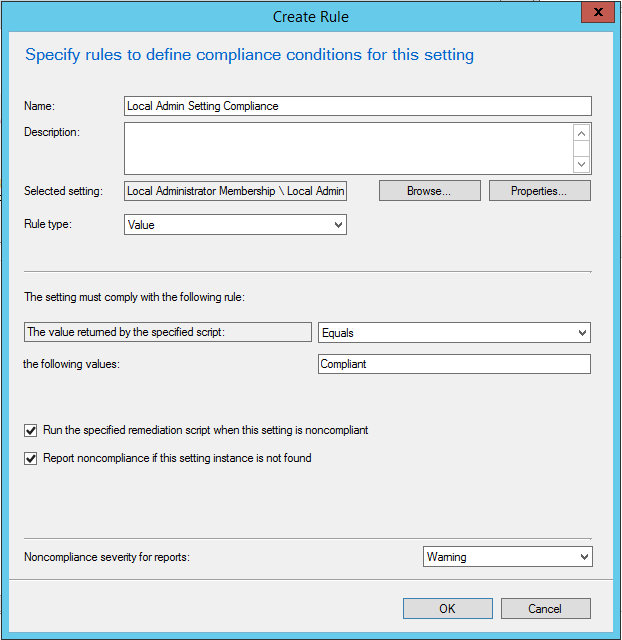
Click OK to close, then Next, Next and Close to finish.
Create a Configuration Baseline
Click on Configuration Baselines and Create Configuration Baseline to create a new baseline.
Give it a name, click Add and add the Configuration Item you just created.

Click OK to close.
Deploy the Baseline
Right-click the baseline and choose Deploy. Make sure to remediate noncompliance and select the collection you wish to target.

Update SCCM Hardware Inventory
Creating the MOF Files
For this part you will need the excellent RegKeyToMOF utility, which you can download from here:
https://gallery.technet.microsoft.com/RegKeyToMof-28e84c28
You will also need to do this on a machine that has either run the remediation script to create the registry keys, or has run the configuration baseline.
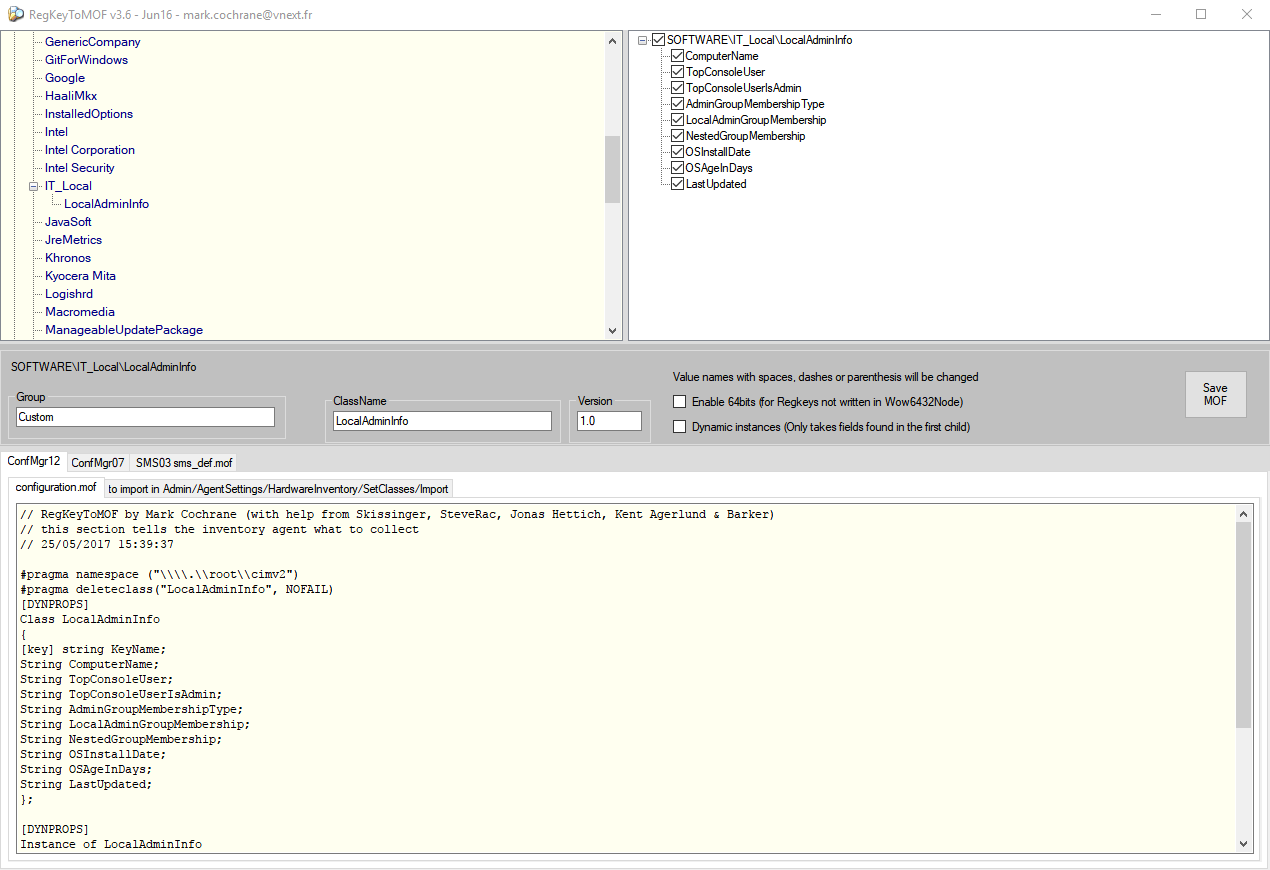
Open RegKeyToMOF and browse to the registry key:
HKLM:SOFTWARE\IT_Local\LocalAdminInfo
You can deselect the ‘Enable 64bits …’ option as the registry key is not located in the WOW6432Node.
Click Save MOF to save the required files.
Copy the SMSDEF.mof and the CM12Import.mof to your SCCM site server.
Update Client Settings
In the SCCM console, navigate Administration > Site Configuration > Client Settings. Open your default client settings and go to the Hardware Inventory page.
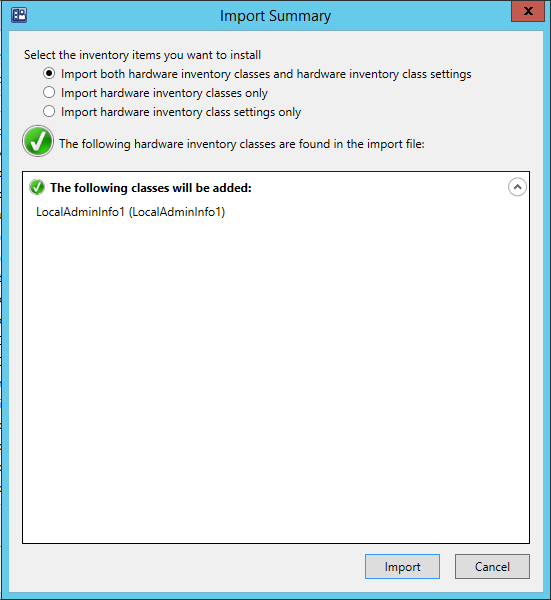
Click Set Classes…, then Import…
Browse to the CM12Import.mof and click Import.
Close the Client Settings windows.
Update Configuration.mof
Now open your configuration.mof file at <ConfigMgr Installation Directory> \inboxes\clifiles.src\hinv.
In the section at the bottom for adding extensions, which starts like this…
//========================
// Added extensions start
//========================
…paste the contents of the SMSDEF.mof file. Save and close the file.
Reporting
Now that you’ve deployed the configuration item and updated the SCCM hardware inventory, a new view called dbo.v_GS_LocalAdminInfo0 has been added to the SCCM database. Note that initially there will be no data here until your clients have updated their policies, ran the configuration baseline, and ran the hardware inventory cycle.
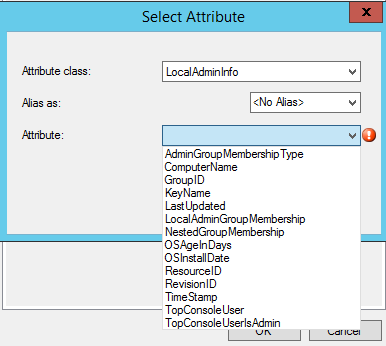
You can query using the Queries node in the SCCM console…
…or create yourself a custom SCCM report, create an Excel report with a SQL data connection, query the SCCM database with PowerShell – whatever method you need or prefer.
Here is a sample SQL query that will query the view and add some client health data and the chassis type to help distinguish between desktop, laptops, servers etc.
Select
  ComputerName0 as 'ComputerName',
  Case When enc.ChassisTypes0 = 1 then 'Other'
    when enc.ChassisTypes0 = 2 then 'Unknown'
    when enc.ChassisTypes0 = 3 then 'Desktop'
    when enc.ChassisTypes0 = 4 then 'Low Profile Desktop'
    when enc.ChassisTypes0 = 5 then 'Pizza Box'
    when enc.ChassisTypes0 = 6 then 'Mini Tower'
    when enc.ChassisTypes0 = 7 then 'Tower'
    when enc.ChassisTypes0 = 8 then 'Portable'
    when enc.ChassisTypes0 = 9 then 'Laptop'
    when enc.ChassisTypes0 = 10 then 'Notebook'
    when enc.ChassisTypes0 = 11 then 'Hand Held'
    when enc.ChassisTypes0 = 12 then 'Docking Station'
    when enc.ChassisTypes0 = 13 then 'All in One'
    when enc.ChassisTypes0 = 14 then 'Sub Notebook'
    when enc.ChassisTypes0 = 15 then 'Space-Saving'
    when enc.ChassisTypes0 = 16 then 'Lunch Box'
    when enc.ChassisTypes0 = 17 then 'Main System Chassis'
    when enc.ChassisTypes0 = 18 then 'Expansion Chassis'
    when enc.ChassisTypes0 = 19 then 'SubChassis'
    when enc.ChassisTypes0 = 20 then 'Bus Expansion Chassis'
    when enc.ChassisTypes0 = 21 then 'Peripheral Chassis'
    when enc.ChassisTypes0 = 22 then 'Storage Chassis'
    when enc.ChassisTypes0 = 23 then 'Rack Mount Chassis'
    when enc.ChassisTypes0 = 24 then 'Sealed-Case PC'
    else 'Unknown'
  End as 'Chassis Type',
  TopConsoleUser0 as 'Primary User',
  TopConsoleUserIsAdmin0 as 'Primary User is Admin?',
  AdminGroupMembershipType0 as 'Primary User Local Admin Group Membership Type',
  LocalAdminGroupMembership0 as 'Local Admin Group Membership',
  NestedGroupMembership0 as 'Primary User Local Admin Nested Group Membership',
  OSAgeInDays0 as 'OS Age (days)',
  OSInstallDate0 as 'OS Installation Date',
  LastUpdated0 as 'Last Updated Date',
  la.TimeStamp as 'HW Inventory Date',
  ch.ClientStateDescription,
  ch.LastActiveTime
from dbo.v_GS_LocalAdminInfo0 la
join v_R_System sys on la.ComputerName0 = sys.Name0
left join v_GS_SYSTEM_ENCLOSURE enc on sys.ResourceID = enc.ResourceID
left join v_CH_ClientSummary ch on sys.ResourceID = ch.ResourceID
where ComputerName0 is not null
  and enc.ChassisTypes0 <> 12
Hi Trevor, i created a similar CI / Baseline, just to write a grab few information on Registry. Did import the .mof file and updated configuration .mof per RegKeyToMof gave me. I do evaluate the Baseline and run hardware inventory but never gets the info on database. I was wondering what could be missing, i thought the hardware inventory grabed that info via WMI classes only, not read the registry itself.
Should I start trying to grab some logs I presume?
Thanks
I realized the configuration.mof is not being propagated down to primary sites. Wonder this is to be done manually?