Note: For a Windows 10 Version, see this blog instead: https://smsagent.wordpress.com/2017/07/06/setting-the-default-wallpaper-for-windows-10-during-configmgr-osd/
Recently I was given an interesting task – set the default wallpaper on new computer builds with ConfigMgr OSD, but don’t lock it such that users can’t change it. It turns out it is simple enough to do, but it requires changing the default wallpaper that comes with windows, which can be found at C:\Windows\Web\Wallpaper\Windows\img0.jpg. If you check the security on that file however, you’ll notice that only the “TrustedInstaller” has full permissions to it, so to change it in the online OS requires messing with permissions. Instead, you can change offline during the WinPE phase of the deployment, which bypasses the permissions problem.
This procedure requires MDT-integrated ConfigMgr 2012, and also requires Windows PowerShell to be added to your boot image. I’ve tested on Windows 7 but should also work with Windows 8.1 as it uses the same location for the default wallpaper.
Create a Wallpaper
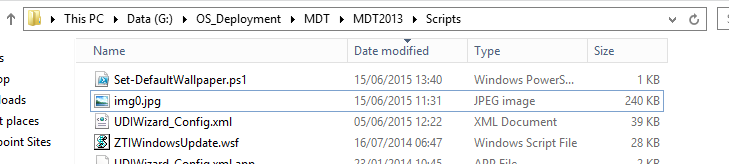
First, create your new default wallpaper. The recommended resolution is 1920×1200, which is the same as the built-in default wallpaper. Save it as “img0.jpg”
Create a PowerShell Script
Use the following code in a new PowerShell Script, and save it as “Set-DefaultWallpaper.ps1”
The script will load some task sequence variables, rename the existing default wallpaper to “img1.jpg”, and copy the new “img0.jpg” into the same directory.
# Get the TS variables
$tsenv = New-Object -COMObject Microsoft.SMS.TSEnvironment
$ScriptRoot = $tsenv.Value('ScriptRoot')
$OSDTargetSystemRoot =  $tsenv.Value('OSDTargetSystemRoot')

# Rename default wallpaper
Rename-Item $OSDTargetSystemRoot\Web\Wallpaper\Windows\img0.jpg img1.jpg -Force

# Copy new default wallpaper
Copy-Item $ScriptRoot\img0.jpg $OSDTargetSystemRoot\Web\Wallpaper\Windows -Force
Copy the files to your MDT Package directory
Copy the new wallpaper and the PowerShell script to the Scripts directory of your MDT package source files, and update the MDT Package to your distribution points.

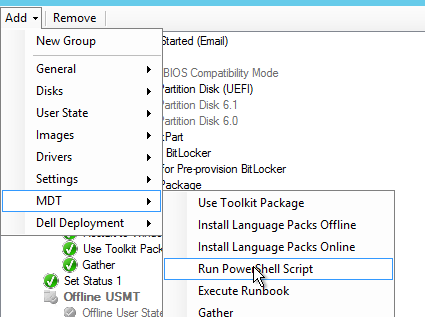
Add a Task Sequence Step
Now edit your OSD task sequence and after the “Apply Operating System Image” Step and before the “Apply Windows Settings” step, add a “Run PowerShell Script” step from the MDT menu.

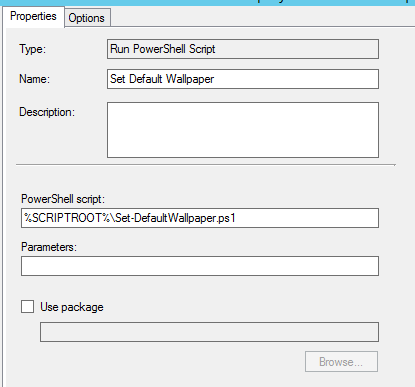
Add the path to the script file in the step, eg %SCRIPTROOT%\Set-DefaultWallpaper.ps1
That’s it! After OSD, your computer will have two files in the location C:\Windows\Web\Wallpaper\Windows, the new default wallpaper, and the old one renamed to “img1.jpg”. Anyone who logs into the computer will get the new default wallpaper, and they are free to change it if they wish.
If you want to also change the colour scheme in Windows 8.1, there’s a nice post on the Coretech blog.
In my MDT Win10 task sequence, I have successfully renamed the original img0.jpg file and copied my custom img0.jpg file to C:\Windows\Web\Wallpaper\Windows\img0.jpg. I am doing this with CMD /C REN and XCOPY “Run commands” in the task sequence rather than use a script. The tasks run in the Post Install phase, so no permission changes are necessary. The problem I am seeing (after deployment) is the original wallpaper is still being used. If I look in the Personalization Settings, my wallpaper is shown in the preview, but like I said, the actual background image shown on the Desktop is the original wallpaper image. The typical registry settings point to the correct img0.jpg file as well. Any idea what’s happening here?
Interesting. I haven’t tested with Windows 10 yet, but perhaps there is an additional registry setting that must be changed. Try searching the registry for the old image file name?
In addition to the steps shown, it looks like you also have to mess with the image files in C:\Windows\Web\4K\Wallpaper\Windows (which are all oddball resolutions). I simply added one more command and renamed that last “Windows” subfolder (effectively disabling it). Now everything works!
$ScriptRoot = $tsenv.Value("ScriptRoot")
$OSDTargetSystemRoot = $tsenv.Value("OSDTargetSystemRoot")
This doesn’t look right.. are you sure this is correct?
Sorry, WordPress messes with code formatting when you make an update. I’ve corrected the script now. Thanks for heads up.
Script is broken.
Fixed now.
Thanks! Do you know if this works with Windows 1 0
Thanks for the writeup! I don’t have SCCM, I just use MDT. I’m going to try this anyway to see if it’ll work, but my challenge is figuring out exactly where in my task sequence to insert the new step. My task sequence steps don’t appear to be named exactly the same as yours. I have, under “Install”:
– Install Operating System
– Next Phase
Then under “PostInstall”:
– Copy Scripts
– Configure
– Inject Drivers
– Add Windows Recovery (WinRE)
– Next Phase
– Restart Computer
I’ll test inserting right after “Add Windows Recovery (WinRE)”. If it doesn’t work, I’ll hope to hear back from you whether this absolutely requires SCCM, or if it can be tweaked to work in vanilla MDT. I’ll also do my own experimenting and post them in the comments if I learn anything useful.
Thanks again for a great resource.
I Got the same Probleme here.
You found any solution?
Hi Bryan,
Did you find where you would need to place the powershell script in task sequence for a vinilla MDT?
Thanks,
Eric
Hi, anybody know when we need to place this script in tasksequence ?
Ok, just for information :
I modified variable “$OSDTargetSystemRoot” like that :
$OSDTargetSystemRoot = “$($tsenv.Value(“OSDisk”))” + “\Windows”
And i put it here :
I have, under “Install”:
– Install Operating System
– Next Phase
Then under “PostInstall”:
– Copy Scripts
– Configure
****Set Default Wallpaper****
– Inject Drivers
– Add Windows Recovery (WinRE)
– Next Phase
– Restart Computer
It works for me
Thanks for sharing!
This worked for me also. Thank you Jerome!
if you use a new installation just add a folder named $OEM$ and place it in the Sources folder of your Windows installatio media. Add another folder below that named $1, $1 designates the Windows partition.
Finish the folder structure like this USB-Drive\Sources\$OEM$\$1\Windows\web\4K\Wallpaper\Windows and place your custom wallpapers there. Don’t forget the folder for the img0.jpg file.
During installation they will replace the default images without the need for scripting or file ownership or taking away user functions
Does this still work on Windows 11?