Note: This blog post is out of date and has been replaced with a new solution which you can find here.
If you use Custom Office templates in your organisation, you can deploy them to your computers using Compliance Settings in ConfigMgr. This also provides a mechanism for updating those templates if necessary, and ensuring that the templates remain installed. In this example, I will deploy a custom PowerPoint template to all computers with a version of Microsoft Office 2010/2013 installed, using ConfigMgr 2012.
Overview
The high-level steps are as follows:
- Create your custom template
- Create preview and thumbnail image files
- Create XML configuration files
- Place them on a network share
- Create a Compliance setting
- Create a Compliance item for machine-based settings using a Powershell script for both discovery and remediation
- Create a Compliance item for user-based settings using a Powershell script for both discovery and remediation
- Create a Compliance baseline, and deploy it to a Collection containing computers with MS Office installed
You can create custom templates for Word, Powerpoint or Excel and the process for deploying them is nicely described in this technet article. I will cover the main points of the process and the additional steps for ConfigMgr.
https://technet.microsoft.com/en-us/library/cc178976(v=office.14).aspx
Create your Custom Template
Create your template and save it as a .potx template file.
Create Thumb and Preview Image Files
This step is optional, but it gives a nice visual indicator of the template when you open the custom templates location, so I include it.

To create the files, use the Windows Snipping tool or something similar and take a snip of the first page of the template. Save it in a supported format (.jpg, .png, .bmp, .gif) and give it a name, something like ‘Contoso_PP_Thumb_2015‘, where Contoso represents your organisation name, or the name of the folder you will be placing your custom templates into. I append the current year to the file name as now and then we will update the templates with new graphics etc, so we need to distinguish it from newer templates in the future.
Copy the file you just created, and rename it ‘Contoso_PP_Preview_2015‘.
Open both image files with an Image editor like MS Paint, and resize them according to the MS recommendations (ymmv):
| Preview type | Width | Height |
|---|---|---|
| Thumbnail | 100 | 120 |
| Preview | 256 | 350 |
Create XML Configuration Files
You need to create a configuration xml file that tells Office how to display the template and where to find the relevant files. In my organisation, I am deploying to both x86 and x64 Operating Systems, so I will create one file for each architecture, the only difference being the path to the template folder, eg
x86: C:\Program Files\Microsoft Office\Templates\Contoso
x64: C:\Program Files (x86)\Microsoft Office\Templates\Contoso
This is an example xml file for x64:
<?xml version="1.0" encoding="utf-8"?>
<o:featuredcontent lcid="1033" xmlns:o="urn:schemas-microsoft-com:office:office">
<o:application id="PP">
<o:featuredtemplates startdate="2011-03-01" enddate="2099-03-01">

<!-- TEMPLATE 1 -->
<o:featuredtemplate title="Contoso PowerPoint Template" source="C:\Program Files (x86)\Microsoft Office\Templates\Contoso\Contoso_PP_Template_2015.potx" >
<o:media mediatype="png" filename="Contoso_PP_Thumb_2015.PNG" source="C:\Program Files (x86)\Microsoft Office\Templates\Contoso\Contoso_PP_Thumb_2015.PNG" />
<o:preview filename="Contoso_PP_Preview_2015.PNG" source="C:\Program Files (x86)\Microsoft Office\Templates\Contoso\Contoso_PP_Preview_2015.PNG" />
</o:featuredtemplate>

</o:featuredtemplates>
</o:application>
</o:featuredcontent>
I’m going to copy my template files from a remote file share to the local path indicated above using the Compliance settings. This path is a place you can store all your custom Office templates, and means they will always be available even offline, although you could use a remote location if you wanted.
You can have several templates in one xml file. The application is specified by the following line: (PP=Powerpoint, WD=Word, XL=Excel).
<o:application id=”PP”>
Save the xml files, something like ‘Contoso_PP_x64_2015.xml‘.
Place the Template Files in a Network Share
Place all your templates files, (PP template, image files and xml files) in a central location that anyone can access. The Compliance settings will copy the files from this location to the local machine.
Create a Configuration Item
In the ConfigMgr Console, navigate to Assets and Compliance > Compliance Settings. Right-click Configuration Items and create a new Configuration Item.
Let’s call it Contoso PowerPoint Template.

On the Settings page, click New to create a new setting. We will create two settings, one for machine-based activities, ie activities that can run with the default ConfigMgr security context, and one for user-based activities, in this case we need to set a registry key in the HKCU branch, so this must run with the logged-on user’s security context.
Machine-Based Settings
Enter a Name for the setting and set the Setting type as Script, and the Data type as String.

Discovery Script
In the Discovery Script section, click Add Script, choose Windows Powershell as the Script language, and paste the following PowerShell script.
# Determine OS Architecture
$OSArch = Get-WmiObject -Class win32_operatingsystem | select -ExpandProperty OSArchitecture

# Set local template location
$ProviderName = "Contoso" # Change
$x86RootPath = "C:\Program Files\Microsoft Office\Templates\$ProviderName"
$x64RootPath = "C:\Program Files (x86)\Microsoft Office\Templates\$ProviderName"

$Compliance = 0

$x86FilesToCheck = @(
    "Contoso_PP_Template_2015.potx", # Change
    "Contoso_PP_Preview_2015.PNG", # Change
    "Contoso_PP_Thumb_2015.PNG", # Change
    "Contoso_PP_x86_2015.xml" # Change
    )

$x64FilesToCheck = @(
    "Contoso_PP_Template_2015.potx", # Change
    "Contoso_PP_Preview_2015.PNG", # Change
    "Contoso_PP_Thumb_2015.PNG", # Change
    "Contoso_PP_x64_2015.xml" # Change
    )

if ($OSArch -eq "64-bit")
    {
        foreach ($file in $x64FilesToCheck)
            {
                if (test-path -Path $x64RootPath\$file)
                    {$Compliance ++}
            }
    }

if ($OSArch -eq "32-bit")
    {
        foreach ($file in $x86FilesToCheck)
            {
                if (test-path -Path $x86RootPath\$file)
                    {$Compliance ++}
            }
    }

if ($Compliance -eq 4)
    {write-host "Compliant"}
else {write-host "Not Compliant"}
Variables to Change
The discovery script contains some variables that you will need to change for your environment, and these have a comment at the end ‘# Change‘.
| Variable Name | Value |
| $ProviderName | The name of the folder you will create that contains your custom template/s. |
| $x86FilesToCheck | This is the list of template filenames relevant to the x86 architecture. The only unique file is the xml file. |
| $x64FilesToCheck | This is the list of template filenames relevant to the x64 architecture. The only unique file is the xml file. |
What Does the Script Do?
The discovery script is used to determine the compliance state. In this case, we check whether the template files have been copied to the local machine and all the files are present and correctly named. SInce the path is different for x86 and x64 OSes, we need to determine the architecture of the machine and then check for the files in the relevant path.
Remediation Script
In the Remediation Script section, click Add Script, choose Windows Powershell as the Script language, and paste the following PowerShell script.
# Determine OS Architecture
$OSArch = Get-WmiObject -Class win32_operatingsystem | select -ExpandProperty OSArchitecture

# Set local template location
$ProviderName = "Contoso" # Change
$x86RootPath = "C:\Program Files\Microsoft Office\Templates\$ProviderName"
$x64RootPath = "C:\Program Files (x86)\Microsoft Office\Templates\$ProviderName"

# Set old  file names
$oldtemplate = "Contoso_PP_Template_2014.potx" # Change
$oldPreviewPNG = "Consoto_PP_Preview_2014.png" # Change
$oldThumbPNG = "Contoso_PP_Thumb_2014.png" # Change
$oldx86xml = "Contoso_PP_x86_2014.xml" # Change
$oldx64xml = "Contoso_PP_x64_2014.xml" # Change

# Set new file names
$newTemplateRootPath = "\\<server>\<fileshare>\Contoso" # Change
$newtemplate = "Contoso_PP_Template_2015.potx" # Change
$newPreviewPNG = "Contoso_PP_Preview_2015.PNG" # Change
$newThumbPNG = "Contoso_PP_Thumb_2015.PNG" # Change
$newx86xml  = "Contoso_PP_x86_2015.xml" # Change
$newx64xml  = "Contoso_PP_x64_2015.xml" # Change

$oldArray = @($oldtemplate,$oldPreviewPNG,$oldThumbPNG,$oldx86xml,$oldx64xml)
$newx86Array = @($newtemplate,$newPreviewPNG,$newThumbPNG,$newx86xml)
$newx64Array = @($newtemplate,$newPreviewPNG,$newThumbPNG,$newx64xml)

# Function to copy the template files
function CopyTemplateFiles {

param($rootpath,$templatearray,$newTemplateRootPath,$oldArray)

        # If template directory doesn't exist, create it
        if (!(test-path -Path $rootpath))
            {New-Item -Path $rootpath -ItemType Directory -Force}
        # Otherwise delete old template files if they exist
        Else
            {
                foreach ($item in $oldarray)
                    {
                        if (Test-path -Path $rootpath\$item)
                            {
                                Remove-Item $rootpath\$item -Force
                            }
                    }
            }
        #  Copy new template files
        foreach ($item in $templatearray)
            {
                Copy-Item -Path $newTemplateRootPath\$item -Destination $rootpath -Force
            }

}

# Let's do it!
if ($OSArch -eq "32-bit")
    {
        CopyTemplateFiles -rootpath $x86RootPath -templatearray $newx86Array -newTemplateRootPath $newTemplateRootPath -oldArray $oldArray
    }

if ($OSArch -eq "64-bit")
    {
        CopyTemplateFiles -rootpath $x64RootPath -templatearray $newx64Array -newTemplateRootPath $newTemplateRootPath -oldArray $oldArray
    }
Variables to Change
The remediation script is the one that will copy the template files to the local machine. It is setup so that you can also update an existing custom template by removing the existing template files and replacing them with the new ones. If there is no existing template, then you don’t need to do anything with the variables that start with ‘old‘. If you are updating an existing template, use the old variables to specify the names of the old template files, and the new variables for the new template files.
| Variable Name | Value |
| $ProviderName | The name of the folder you will create that contains your custom template/s. |
| $oldtemplate | The name of the template file you want to replace, if you are updating the template |
| $oldPreviewPNG | The name of the Preview image file you want to replace, if you are updating the template |
| $oldThumbPNG | The name of the Thumbnail image file you want to replace, if you are updating the template |
| $oldx86xml | The name of the x86 xml file you want to replace, if you are updating the template |
| $oldx64xml | The name of the x64 xml file you want to replace, if you are updating the template |
| $newTemplateRootPath | The UNC path to the network share you will copy the template files from |
| $newtemplate | The name of the template file |
| $newPreviewPNG | The name of the Preview image file |
| $newThumbPNG | The name of the Thumbnail image file |
| $newx86xml | The name of the x86 xml file |
| $newx64xml | The name of the x64 xml file |
What Does the Script Do?
We check if there are any existing template files with the names specified in the old variables, and remove them. Then we copy the new template files to the relevant local path according to the OS architecture.
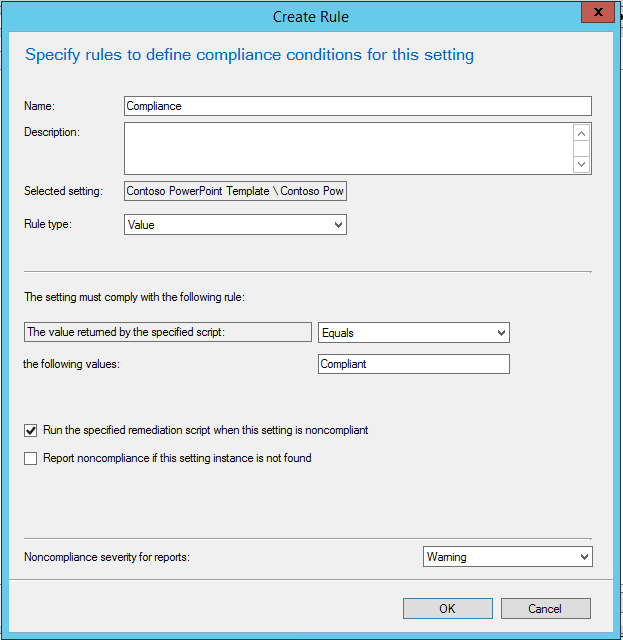
Compliance Rule
On the Compliance Rules tab, click New to create a new rule. If the discovery script determines that the machine is compliant, it will output the value ‘Compliant‘, so we will use that in the Compliance rule. We will also check the box to run the remediation script if the setting is non-compliant.
User-Based Settings
In the same Compliance item, add a new Compliance setting for the user-based settings. In this setting, we must check the box ‘Run scripts by using the logged on user credentials‘.

Discovery Script
In the Discovery Script section, click Add Script, choose Windows Powershell as the Script language, and paste the following PowerShell script
# Set PowerPoint exe locations
$x64_PP_2013 ="C:\Program Files (x86)\Microsoft Office\Office15\POWERPNT.EXE"
$x86_PP_2013 ="C:\Program Files\Microsoft Office\Office15\POWERPNT.EXE"
$x64_PP_2010 ="C:\Program Files (x86)\Microsoft Office\Office14\POWERPNT.EXE"
$x86_PP_2010 ="C:\Program Files\Microsoft Office\Office14\POWERPNT.EXE"

# Set Registry key paths
$Office_2010_path = "HKCU:\Software\Microsoft\Office\14.0\Common\Spotlight\Providers"
$Office_2013_path = "HKCU:\Software\Microsoft\Office\15.0\Common\Spotlight\Providers"
$Provider_Name = "Contoso" # Change

# Set Registry key values
$x64_key = "C:\\Program Files (x86)\\Microsoft Office\\Templates\\$Provider_Name\\"
$x86_key = "C:\\Program Files\\Microsoft Office\\Templates\\$Provider_Name\\"
$x64_xml = "Contoso_PP_x64_2015.xml" # Change
$x86_xml = "Contoso_PP_x86_2015.xml" # Change

# Function to check the registry key value
function CheckRegKey {

param ($office_path,$Branch_Name,$key_value,$xml)
        $key = Get-ItemProperty -Path $office_path\$Branch_Name -Name ServiceURL -ErrorAction SilentlyContinue | Select -ExpandProperty ServiceURL
        if (!$key)
            {write-host "Not Compliant"; break}
        if ($key -eq "$key_value" + "$xml")
            {write-host "Compliant"}
        if ($key -ne "$key_value" + "$xml")
            {write-host "Not Compliant"}
}

# Let's do it!
if (Test-Path $x64_PP_2013)
    { CheckRegKey -office_path $Office_2013_path -Branch_Name $Provider_Name -key_value $x64_key -xml $x64_xml }

if (Test-Path $x86_PP_2013)
    { CheckRegKey -office_path $Office_2013_path -Branch_Name $Provider_Name -key_value $x86_key -xml $x86_xml }

if (Test-Path $x64_PP_2010)
    { CheckRegKey -office_path $Office_2010_path -Branch_Name $Provider_Name -key_value $x64_key -xml $x64_xml }

if (Test-Path $x86_PP_2010)
    { CheckRegKey -office_path $Office_2010_path -Branch_Name $Provider_Name -key_value $x86_key -xml $x86_xml }
Variables to Change
The $Provider_Name variable should be the same as the $ProviderName variable you used in the scripts for the machine settings.
| Variable Name | Value |
| $Provider_Name | The name of the folder you will create that contains your custom template/s. |
| $x64_xml | The name of the x64 xml file |
| $x86_xml | The name of the x86 xml file |
What Does the Script Do?
The discovery script will check whether a registry key ‘ServiceURL‘ has been set and contains the correct value. Since the script may run on either x86 or x64 OSes, and it may be used for either Office 2010 or Office 2013, we need to define the appropriate locations of the PowerPoint executable and registry key paths in the script.
Remediation Script
In the Remediation Script section, click Add Script, choose Windows Powershell as the Script language, and paste the following PowerShell script.
# Set PowerPoint exe locations
$x64_PP_2013 ="C:\Program Files (x86)\Microsoft Office\Office15\POWERPNT.EXE"
$x86_PP_2013 ="C:\Program Files\Microsoft Office\Office15\POWERPNT.EXE"
$x64_PP_2010 ="C:\Program Files (x86)\Microsoft Office\Office14\POWERPNT.EXE"
$x86_PP_2010 ="C:\Program Files\Microsoft Office\Office14\POWERPNT.EXE"

# Set Reg branch paths / names
$reg_root_path_2010 = "HKCU:\Software\Microsoft\Office\14.0\Common"
$reg_root_path_2013 = "HKCU:\Software\Microsoft\Office\15.0\Common"
$reg_branch_1 = "Spotlight"
$reg_branch_2 = "Providers"
$reg_Key_name = "Contoso" # Change
$x64_xml = "Contoso_PP_x64_2015.xml" # Change
$x86_xml = "Contoso_PP_x86_2015.xml" # Change

# Set Reg key values
$newx86xml = "C:\\Program Files\\Microsoft Office\\Templates\\$reg_Key_name\\$x86_xml"
$newx64xml = "C:\\Program Files (x86)\\Microsoft Office\\Templates\\$reg_Key_name\\$x64_xml"

# Function to add the registry key
function AddRegKey {

param ($reg_root_path,$reg_key_Name,$xml,$reg_branch_1,$reg_branch_2)

# Does reg branch exist?  If not, create it
if (!(Test-path $reg_root_path\$reg_branch_1))
    {
        New-Item -Path $reg_root_path -Name $reg_branch_1
    }
if (!(Test-path $reg_root_path\$reg_branch_1\$reg_branch_2))
    {
        New-Item -Path $reg_root_path\$reg_branch_1 -Name $reg_branch_2
    }
if (!(Test-path $reg_root_path\$reg_branch_1\$reg_branch_2\$reg_Key_name))
    {
        New-Item -Path $reg_root_path\$reg_branch_1\$reg_branch_2 -Name $reg_Key_name
    }
# Add reg key
    New-ItemProperty -Path $reg_root_path\$reg_branch_1\$reg_branch_2\$reg_Key_name -Name ServiceURL -Value $xml -Force
}

# X64 OS and Office 2013
if (test-path $x64_PP_2013)
    { AddRegKey -reg_root_path $reg_root_path_2013 -reg_key_Name $reg_Key_name -xml $newx64xml -reg_branch_1 $reg_branch_1 -reg_branch_2 $reg_branch_2 }

# X64 OS and Office 2010
if (test-path $x64_PP_2010)
    { AddRegKey -reg_root_path $reg_root_path_2010 -reg_key_Name $reg_Key_name -xml $newx64xml -reg_branch_1 $reg_branch_1 -reg_branch_2 $reg_branch_2 }

# X86 OS and Office 2013
if (test-path $x86_PP_2013)
    { AddRegKey -reg_root_path $reg_root_path_2013 -reg_key_Name $reg_Key_name -xml $newx86xml -reg_branch_1 $reg_branch_1 -reg_branch_2 $reg_branch_2 }

# X86 OS and Office 2010
if (test-path $x86_PP_2010)
    { AddRegKey -reg_root_path $reg_root_path_2010 -reg_key_Name $reg_Key_name -xml $newx86xml -reg_branch_1 $reg_branch_1 -reg_branch_2 $reg_branch_2 }
Variables to Change
The $reg_Key_name variable should be the same as the $provider_name variable you have set in the previous scripts
| Variable Name | Value |
| $reg_Key_name | The name of the folder you will create that contains your custom template/s. |
| $x64_xml | The name of the x64 xml file |
| $x86_xml | The name of the x86 xml file |
What Does the Script Do?
The remediation script sets the following registry key in the current user hive. The key defines the location of the xml file, which contains the locations of the custom template files.
Branch: HKCU:\Software\Microsoft\Office\<office_version>\Common\Spotlight\Providers
Key: ServiceURL
In some cases, the ..\Spotlight\Providers branch may not yet have been created, so the script will create the full branch if necessary.
Like the discovery script, it may run on either x86 or x64 OSes, and it may be used for either Office 2010 or Office 2013, so we need to define the appropriate locations of the PowerPoint executable and registry key paths in the script.
Compliance Rule
Add a Compliance Rule to this setting in the same way you did for the machine-based settings.
Complete the Configuration Item wizard to finish.
Create a Configuration Baseline
In the ConfigMgr Console, right-click Configuration Baselines and create a new Baseline. Add the Configuration Item you created.

Create a Collection of Computers with MS Office Installed
I use the following query to create a collection of all computers that have any variant of Microsoft Office 2010/2013 Installed:
select SMS_R_SYSTEM.ResourceID,SMS_R_SYSTEM.ResourceType,SMS_R_SYSTEM.Name,SMS_R_SYSTEM.SMSUniqueIdentifier,SMS_R_SYSTEM.ResourceDomainORWorkgroup,SMS_R_SYSTEM.Client from SMS_R_System inner join SMS_G_System_INSTALLED_SOFTWARE on SMS_G_System_INSTALLED_SOFTWARE.ResourceID = SMS_R_System.ResourceId where SMS_G_System_INSTALLED_SOFTWARE.ProductName like "Microsoft Office Enterprise%" or SMS_G_System_INSTALLED_SOFTWARE.ProductName like "Microsoft Office Home and Business%" or SMS_G_System_INSTALLED_SOFTWARE.ProductName like "Microsoft Office Professional%" or SMS_G_System_INSTALLED_SOFTWARE.ProductName like "Microsoft Office Home and Student%" or SMS_G_System_INSTALLED_SOFTWARE.ProductName like "Microsoft Office Standard%"
To use this query, you will need to enable the Installed Software class in your hardware inventory (Client settings > Hardware Inventory > Set classes)

Deploy the Baseline
Finally, deploy the Compliance Baseline to your collection. Remember to check the option to remediate non-compliant rules:

You can create multiple Configuration Items and settings deploying templates for multiple applications using the same baseline.
Updating the Template
To update the template to a new version, you need to do the following:
- Copy the new template file to the network share and make sure it has a different name to the old one, eg append ‘_v2’ to the filename for example.
- Copy the two xml files in the network share, and also append the next version number to the filenames.
- Edit the xml files, changing the filename of the template in the featuredtemplate line to the new version.
- Update the Discovery script for the Machine settings. Update lines 12,15, 19, 22 with the filenames of the new template and xml files
- Update the Remediate script for the Machine settings. Update lines 10, 13, 14 with filenames of the old template and xml files (ie the ones you want to replace). Update lines 18, 21, 22 with the filenames of the new template and xml files.
- Update the Discovery script for the User settings. Update lines 15, 16 with the new xml filenames.
- Update the Remediate script for the User settings. Update lines 13, 14 with the new xml filenames.
- Finally you will need to deploy an additional User configuration setting using the same process described previously, but using the discovery and remediation scripts below. These will check and update another registry key where the content location of the template file is stored.
Discovery Script
# Set PowerPoint exe locations
$x64_PP_2013 ="C:\Program Files (x86)\Microsoft Office\Office15\POWERPNT.EXE"
$x86_PP_2013 ="C:\Program Files\Microsoft Office\Office15\POWERPNT.EXE"
$x64_PP_2010 ="C:\Program Files (x86)\Microsoft Office\Office14\POWERPNT.EXE"
$x86_PP_2010 ="C:\Program Files\Microsoft Office\Office14\POWERPNT.EXE"

# Set Reg branch paths / names
$provider_name = "Contoso"
$reg_root_path_2010 = "HKCU:\Software\Microsoft\Office\14.0\Common\Spotlight\Content\$provider_name\PP1033\FeaturedTemplates\1\1"
$reg_root_path_2013 = "HKCU:\Software\Microsoft\Office\15.0\Common\Spotlight\Content\$provider_name\PP1033\FeaturedTemplates\1\0000001"

# The value of the 'source' registry key, which is the location of the template
$new_template_name = "Contoso_PowerPoint_Template_2015_v2.potx"
$x64_Template = "C:\Program Files (x86)\Microsoft Office\Templates\$provider_name\$new_template_name"
$x86_Template = "C:\Program Files\Microsoft Office\Templates\$provider_name\$new_template_name"

# Function to check the registry key
function CheckRegKey {

param ($Branch_Name, $key_value)
        $key = Get-ItemProperty -Path $Branch_Name -Name source -ErrorAction SilentlyContinue | Select -ExpandProperty source
        if (!$key)
            {write-host "Not Compliant"; break}
        if ($key -eq "$key_value")
            {write-host "Compliant"}
        if ($key -ne "$key_value")
            {write-host "Not Compliant"}
}

# Function to check the registry path
function CheckRegPath {

param ($reg_root_path)
if (!(Test-path $reg_root_path))
    {
        Write-host "Compliant"
        break
    }
}

# X64 OS and Office 2013
if (test-path $x64_PP_2013)
    {
        CheckRegPath -reg_root_path $reg_root_path_2013
        CheckRegKey -Branch_Name $reg_root_path_2013 -key_value $x64_Template
     }

# X64 OS and Office 2010
if (test-path $x64_PP_2010)
    {
        CheckRegPath -reg_root_path $reg_root_path_2010
        CheckRegKey -Branch_Name $reg_root_path_2010 -key_value $x64_Template
     }

# X86 OS and Office 2013
if (test-path $x86_PP_2013)
    {
        CheckRegPath -reg_root_path $reg_root_path_2013
        CheckRegKey -Branch_Name $reg_root_path_2013 -key_value $x86_Template
     }

# X86 OS and Office 2010
if (test-path $x86_PP_2010)
    {
        CheckRegPath -reg_root_path $reg_root_path_2010
        CheckRegKey -Branch_Name $reg_root_path_2010 -key_value $x86_Template
     }
Variables to Change
The $Provider_Name variable should be the same as the $ProviderName variable you used in the scripts for the machine settings.
| Variable Name | Value |
| $Provider_Name | The name of the folder you created that contains your custom template/s. |
| $new_template_name | The filename of the new template document |
What Does the Script Do?
The discovery script will check whether the ‘source’ registry key in the branch indicated contains the correct filename and location for the new template file.
Remediation Script
# Set PowerPoint exe locations
$x64_PP_2013 ="C:\Program Files (x86)\Microsoft Office\Office15\POWERPNT.EXE"
$x86_PP_2013 ="C:\Program Files\Microsoft Office\Office15\POWERPNT.EXE"
$x64_PP_2010 ="C:\Program Files (x86)\Microsoft Office\Office14\POWERPNT.EXE"
$x86_PP_2010 ="C:\Program Files\Microsoft Office\Office14\POWERPNT.EXE"

# Set Reg branch paths / names
$provider_name = "Contoso"
$reg_root_path_2010 = "HKCU:\Software\Microsoft\Office\14.0\Common\Spotlight\Content\$provider_name\PP1033\FeaturedTemplates\1\1"
$reg_root_path_2013 = "HKCU:\Software\Microsoft\Office\15.0\Common\Spotlight\Content\$provider_name\PP1033\FeaturedTemplates\1\0000001"

# The value of the 'source' registry key, which is the location of the template
$new_template_name = "Contoso_PowerPoint_Template_2015_v2.potx"
$x64_Template = "C:\Program Files (x86)\Microsoft Office\Templates\$provider_name\$new_template_name"
$x86_Template = "C:\Program Files\Microsoft Office\Templates\$provider_name\$new_template_name"

# Function to add the registry key
function AddRegKey {

param ($reg_root_path,$reg_key_Name)

    New-ItemProperty -Path $reg_root_path -Name source -Value $reg_key_name -Force
}

# X64 OS and Office 2013
if (test-path $x64_PP_2013)
    {
        AddRegKey -reg_root_path $reg_root_path_2013 -reg_key_Name $x64_Template
     }

# X64 OS and Office 2010
if (test-path $x64_PP_2010)
    {
        AddRegKey -reg_root_path $reg_root_path_2010 -reg_key_Name $x64_Template
     }

# X86 OS and Office 2013
if (test-path $x86_PP_2013)
    {
        AddRegKey -reg_root_path $reg_root_path_2013 -reg_key_Name $x86_Template
     }

# X86 OS and Office 2010
if (test-path $x86_PP_2010)
    {
        AddRegKey -reg_root_path $reg_root_path_2010 -reg_key_Name $x86_Template
     }
Variables to Change
The $Provider_Name variable should be the same as the $ProviderName variable you used in the scripts for the machine settings.
| Variable Name | Value |
| $Provider_Name | The name of the folder you created that contains your custom template/s. |
| $new_template_name | The filename of the new template document |
What Does the Script Do?
The remediation script will update the ‘source’ registry key in the branch indicated with the correct filename and location for the new template file.