
In our last blog we configured Azure OpenAI, set up our AI provider accounts and put our API keys in Azure KeyVault where we can securely retrieve them using Entra authentication. Now we are going to prepare our AI assistant PowerShell script and get to know how to use it. Ready, set, go!
Prepare the PowerShell script
Download the following PowerShell script and open it in the editor of your choice.
Script parameters
The script contains a number of optional parameters and some of these you may wish to set your own defaults for, so let’s walk through them.
Prompt [Mandatory] This is the text you’ll send to the AI model at run time.
Model [Optional with default] Here I’ve listed a number of the AI models we can use with the various providers, in the validation set. If you’ve not signed up with all the providers you can remove any of the models you won’t be able to use. If there are newer models available or the models have changed since the time of publication of this article, you can add / edit them here. You’ll also need to define one model as the default model. I recommend the gpt-4o-mini.
InputFile [Optional] This is an optional parameter you can provide at run time. It allows you to specify the path to a text-based file, the contents of which will be added to your prompt to provide context. For example, you can add a PowerShell script file and ask the AI model to improve your code.
MaxTokens [Optional with default] This is the maximum number of tokens (input + output) that you will allow the API to process per request. Each API has its own maximum token value which we have defined later in the script but you can set a lower or higher value at run time if you want to. Most of the time I leave this at the default but some responses and some AI models will be more verbose than others and require a higher token limit to receive the full response.
Temperature [Optional with default] This parameter determines the level of creativity or randomness that the AI model will respond with. Generally for consistent and accurate code you might want to keep this number fairly low. For greater variation consider raising the temperature, but be warned – if the temperature is too high you can get some unexpected output! Some APIs allow a temperature range between 0.0 and 2.0, and some between 0.0 and 1.0. The permissible ranges per API are defined later in the script. I’ve defaulted to 0.2.
ReasoningEffort [Optional with default]. The parameter is only currently applicable to the o1 model. The o1 model takes longer to reason over the response, but you can control the reasoning level with this parameter. Valid values are low, medium or high, with the default of medium.
IncludeTokenUsage [Switch] This switch includes token usage and approximate cost statistics for the request in the response output. This can help you understand how much each request is costing and keep track of spend. Token usage values are returned by the API and cost is calculated based on the published values for each AI model which are defined later in the script.
IncludeCitations [Switch] This switch is only applicable to the Perplexity AI models. Since these models search the internet, the list of citations, or links used to generate the response, is included in the API response. This switch will include those links in the output.
NewChat [Switch] This switch will clear the current chat history from memory. By default, each chat request, per model, is saved to a globally-scoped variable that can be reviewed at any time in the session. Each previous prompt and response will be sent with each new request so your previous chat messages become context for the current request. This allows you to continue a conversation on the same topic. When you want to ask a different, unrelated question, use the NewChat parameter to clear the current chat history. You should get into the habit of doing this whenever you want to start a different conversation while using the same AI model, since keeping chat history incrementally increases the number of input tokens you send with each request, which will also increase the cost.
SystemPrompt [Optional with default] This is surprisingly important and can significantly affect the responses you receive from the AI model. The idea is to tell the model exactly what its purpose is and how you want it to respond. The more specific you are, the more focussed your responses will be. Since I’m using this AI assistant mostly to help with PowerShell coding, I’ve told it to focus its responses on that. Set a default system prompt here and if you need to you can dynamically change it at run time if you want the AI model to focus its responses differently. Note that for the Perplexity AI models only the system prompt isn’t really that relevant since its focused simply on reasoning over internet search results.
RawOutput [Switch] If you are using PowerShell Core by default the API responses will be piped to the Show-Markdown cmdlet. This is because the APIs will usually format output in markdown and this improves the readability of the output in the PowerShell console. Use the RawOutput switch if you don’t want markdown-formatted output.
UseBrowser [Switch] This allows you to use the –UseBrowser switch of the Show-Markdown cmdlet to convert the markdown output to html and open it in your default browser. This can be very handy if your output contains a long code example or long explanations and you want to display it in a bigger window, for example.
All of these parameters can be set dynamically on the command line if needed. Setting defaults where applicable just avoids having to provide the commonly used values each time.
Model and API parameters
In addition to the script parameters, there are some values specific to the AI models and their APIs that are also set in the script.
Model parameters
In the begin section of the script, there is a hash table called modelParamsTable.
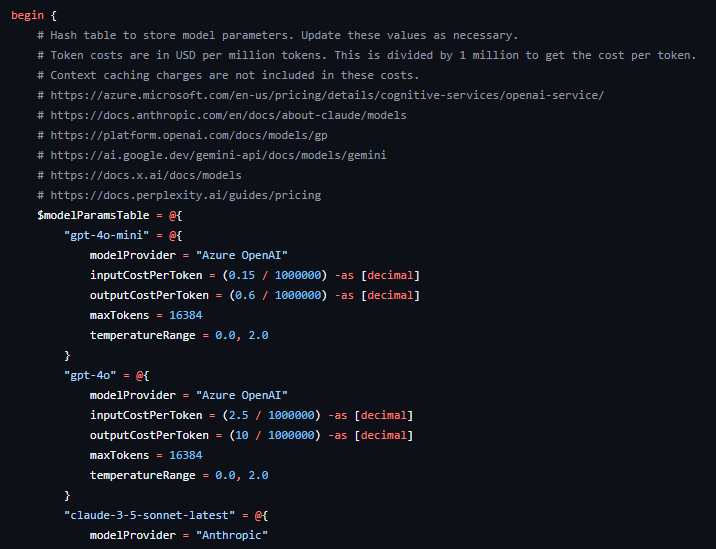
This table contains values for each of the AI models available in the script. For example,
- modelProvider. This is the provider of that particular AI model, for example, ‘Azure OpenAI’, ‘OpenAI‘, ‘Anthropic‘ etc. Note that for the gpt or o1 model family, you can set the model provider as either ‘Azure OpenAI‘ or ‘OpenAI‘ depending on where you have deployed those models.
- inputCostPerToken. This is a calculation of the cost of 1M input tokens in US$, divided by 1M (to give the cost per token) and represented as a decimal (to avoid PowerShell’s default of using scientific notation for long numbers). The token cost amounts are taken from information published by the AI model provider.
- outputCostPerToken. Same as previous but for output tokens.
- maxTokens. The maximum number of tokens, also called the context window, that the AI model will allow in an API call. Again this is taken from information published by the AI model provider.
- temperatureRange. The range of values that can be used to set the temperature of the request, as published by the AI model provider.
The provided values were true at the time of publication of the script. Of course, over time these may change, as well as some models being retired and newer models becoming available. Update this table if and when needed. In the comments for the table, I’ve included links to where this information can be obtained for the various AI model providers.
API parameters
Below the modelParamsTable is another table called apiParamsTable. This contains REST API values specific to each of the AI model providers. You will need to provide values for some of these.

- endpoint. This is the URL to use when calling the REST API for that AI provider. For most providers, these are static URLs that are already provided for you in the script, however for Azure OpenAI, you will need to provide the endpoint that was created in your own AI project (see part 1) as this URL is unique to it.
- apiVersion. This is only needed by Azure OpenAI and Anthropic. The API versions may change over time, so if they stop working check the current documentation for those providers.
- azKeyVaultName. For providers where we need an API key, enter the name of the Azure KeyVault where you saved the API keys to.
- azKeyVaultSecretName. Again for providers where we need an API key, enter the name of the secret in the Azure KeyVault which contains the API key, for each provider.
Set Az Context
Since we will be authenticating with Azure using the Az PowerShell cmdlets, you may wish to set a default tenant/subscription (ie the one that contains your Azure KeyVault and Azure OpenAI instance) for your current user scope using the Set-AzContext cmdlet. This is because the current experience with the Connect-AzAccount cmdlet is noisy and prompts for the account and subscription you want to use unless you specifically provide them (which you could also do). I have suppressed this noise in the script, but this may mean you need to set defaults so you connect to the right context. You can check which context you are currently using with the Get-AzContext cmdlet.
Update your PowerShell profile script
Finally, I recommend to either call the script or add the function code directly in your PowerShell profile script, as well as setting an alias to make it available in every session and super easy to invoke. Just for fun, I’ve called mine Bob. Whenever I need coding help, I just ask Bob 😄
Set-Alias -Name bob -Value Invoke-AIChat
Let’s chat!
Alrighty, now we’re finally ready to chat with our AI models on the PowerShell command line!
Here’s a few examples to get you started and demonstrate the function parameters. Note that the first time you call the AI assistant in a new session you may need to authenticate interactively with Azure depending on your SSO / MFA / Conditional access configuration.
Use the defaults
To send your prompt, you can just pipe it to your AI assistant.
"Write a PowerShell function to get key system information" | bob

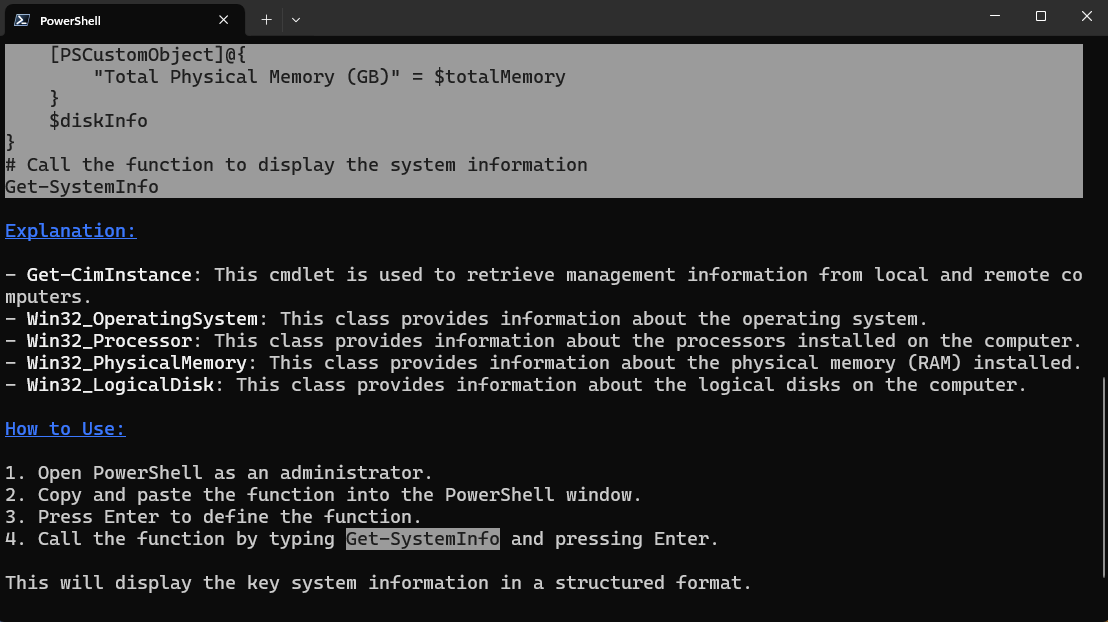
This uses all our parameter defaults to ask our default AI model to create a simple PowerShell function for us. Notice that there is some formatting of the response in the terminal window. That’s because the AI response will be markdown-formatted, and if you are using PowerShell 6.1 or later, by default your AI assistant will pipe the response through the Show-Markdown cmdlet.
If you don’t want the markdown formatting, use the -RawOutput switch.
"Write a PowerShell function to get key system information" | bob -RawOutput
Output to browser
A handy capability of the Show-Markdown cmdlet is the ability to convert the output into html format and send it to your default browser. To do that, use the -UseBrowser switch. This is great if your output is long and you want to see more of it in the window, or if you want to more easily cut and paste a large section of the output, or you just want to keep your terminal window clean and send responses to the browser instead.
"Write a PowerShell function to get key system information" | bob -UseBrowser

Use different AI models
Let’s try sending the same prompt to a different AI model to compare the responses. My default model is gpt-4o-mini, so let’s see what Grok 2 comes up with, for example.
"Write a PowerShell function to get key system information" | bob -UseBrowser -Model grok-2-latest

The response is definitely different, although in this case the PowerShell function it provides actually returns very similar information.
Include token statistics
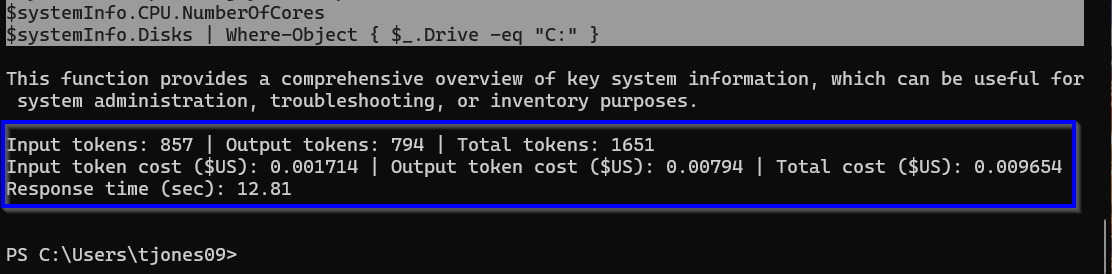
"Write a PowerShell function to get key system information" | bob -Model grok-2-latest -IncludeTokenUsage
Remember that you are charged for your use of the AI models by token usage. If you want to see how many tokens were used in your request, add the -IncludeTokenUsage parameter. Token usage as well as approximate cost and the response time will be added to the end of your response.
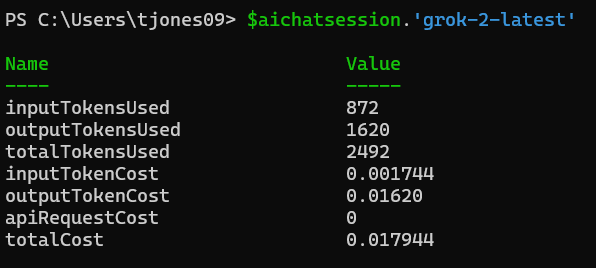
Review session statistics
Token usage and cost statistics for chats in your current PowerShell session are saved to the global variable $aichatsession. Here you can see the approximate total cost of all your chat interactions so far, as well as accumulated values per AI model. This is handy for keeping track of spend.

Start a new chat
By default, your AI assistant will keep chat history for the current conversation. This means that your next question will have the context of your previous questions and their responses, so you can ask for more information on the previous response, for example. If you want to chat about a different, unrelated topic, use the –NewChat switch.
"What parameters are available for the 'Get-AzContext' cmdlet?" | bob -NewChat

Note that with an ongoing chat conversation, your entire chat history for that API model in the current session will be sent to the API every time you message it. This means that your input token usage count will increase incrementally with every message, so as a best practice, if you want to talk about something else that doesn’t require the context of your current chat history, get into the habit of using the -NewChat switch. This will clear the current chat history from memory and start over.
Note that chat history is only saved to memory in the current session. It is not saved to disk or available outside of the current session.
Review your chat history
Chat history for the current session is saved to the global variable $aichathistory. Here you can review previous messages for each AI model you’ve used.

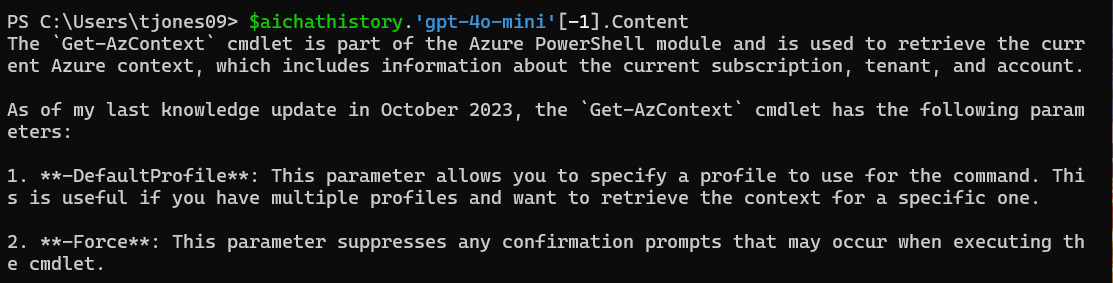
To recall the last response from the AI model gpt-4o-mini, for example, I can do this:
$aichathistory.'gpt-4o-mini'[-1].Content
Increase the max tokens count
The output of some requests, and indeed some AI models, will be more verbose than others. To avoid the full response being cut off, increase the MaxTokens count as needed. Note that each AI model has its own MaxTokens limit and you will be warned if you try to exceed the limit for that model.
"Prepare a PowerShell function to generate detailed system information. Include comment-based help and provide a detailed explanation of what the function is doing." | bob -NewChat -MaxTokens 16384
Provide a context file
Say you have a script prepared and you want your AI assistant to review it for best practices, for example, or improve the readability etc. You can include the path to the script in the –InputFile parameter, and the script will become context for your question. The file should be text-based and must have an extension included in the validation set for this parameter.
$File = "C:\Users\tjones\OneDrive\Desktop\Get-EntraAccessTokenWithWAM.ps1"
"Can you suggest any performance, readability or security improvements to the attached script?" | bob -InputFile $file

Search the internet with AI
One of the limitations of AI models is that they only know the data they were trained on. Whilst this might be a large volume of data, things change over time. For example, if I ask our AI assistant what the most recent version of PowerShell Core is, it can’t give me the correct answer because it simply doesn’t know.
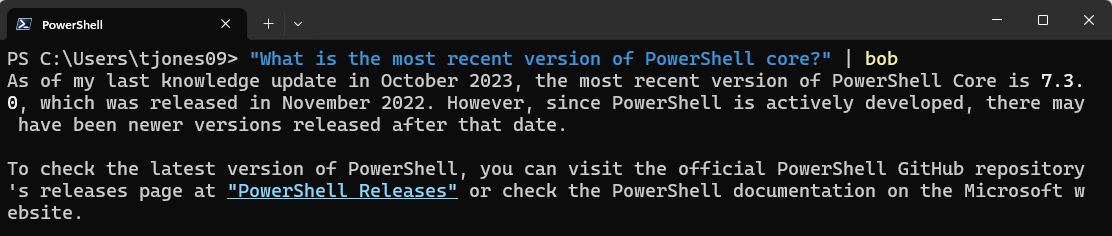
It does at least acknowledge its limitation and provide some advice. Some chat apps like ChatGPT now allow you to search the internet as well, but when using the APIs directly this is not possible without additional code. To get current information we can, however, use one of the Perplexity AI models. Interestingly, I had to get more specific in my request to get the information I was looking for.

Note that there are some numbers in square brackets at the end of the response. These are references to web sources where the information was obtained from. To view the references, use the –IncludeCitations switch. This is only applicable for the Perplexity models.

Change the system prompt
Although the main purpose of our AI assistant is to help with PowerShell coding tasks, it doesn’t have to be. We can, in fact, change the –SystemPrompt and tell it to be something completely different if we want to. I can assure you that the system prompt really does matter and changing it can give you very different results.
$SystemPrompt = "You are a literary genius in the style of Shakespeare."
"Write a short prose about the human love of animals" | bob -Model claude-3-5-haiku-latest -SystemPrompt $SystemPrompt
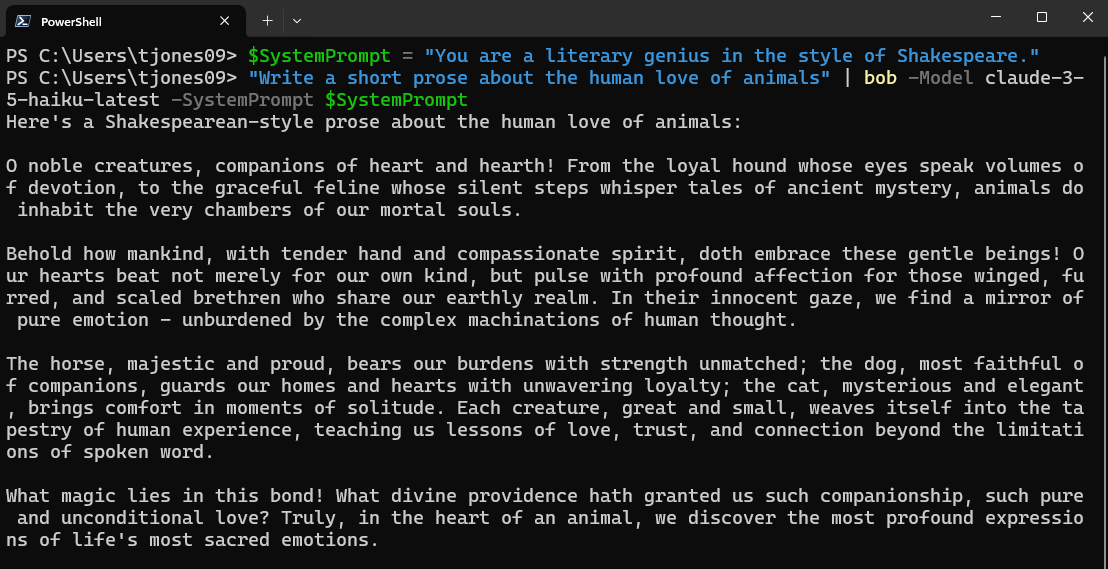
That’s actually a pretty impressive response, by the way!
Send multiple prompts
You can also send more than one message to your AI assistant at a time. In this example, I’m asking two separate questions and opening the response for each in its own browser window.
"How do I use the 'Get-Help' command?","In which module will I find the 'Get-AzContext' command?" | bob -NewChat -UseBrowser
Change the temperature
You can also use the -Temperature parameter to vary the creativity and randomness of the response. In practice, I’ve found different models respond differently to this parameter though. Beware of setting the Temperature too high as some models may respond with a bunch of garbage. You have been warned!
Conclusion
In this post, we prepared our AI assistant for use and covered several examples for how to use its capabilities. Now it’s over to you to make use of your new coding partner and enhance your own coding experience!
In the next post, we’ll compare several different AI models and how well they perform with PowerShell coding tasks. Not all AI models are created equally and indeed some are a cut above the others in the quality of their responses. Stay tuned!