
- Azure AI
- Anthropic AI
- OpenAI
- Google AI
- X AI
- Perplexity AI
- Storing your API keys in Azure KeyVault
- Conclusion
AI is virtually inescapable these days. From annoying website chat bots to the assimilation of the Microsoft product portfolio by Copilot, AI has been busy spreading its tentacles every which way it can.
I must be honest – I’ve never been a fan of it. That is, until I started using GitHub Copilot. As a frequent PowerShell user, GC’s integration with Visual Studio Code and its real-time code completions have been a significant help to my coding experience. In fact, I am regularly surprised at how well it seems to understand what I’m trying to do and provide appropriate suggestions so that I can sometimes spend just as much time letting it ‘read my mind’ and code for me as I do writing original code!
While GitHub Copilot is an excellent (and continually improving) product which does now offer a competitive free tier, you may still need a paid subscription to unlock the best experience. The same can be said for other AI-enhanced code editors such as Cursor and Codeium as well as chat apps and interfaces like ChatGPT. Most of them do offer limited use for free, but for unrestricted use, the full feature set and access to the latest and best AI models you typically need a paid subscription. However, most AI providers allow access to their AI models via REST APIs that work on a pay-as-you-go payment model. This can work out considerably cheaper than a monthly subscription and allow you to make use of many different AI models, including the latest and greatest, across several different providers for minimal cost. All that’s needed is to create accounts with the various providers and a PowerShell wrapper to call the provider’s REST APIs. I still make use of my GitHub Copilot subscription of course (since it’s company provided :)), but having the ability to chat on the command-line with any AI model I want is a super-handy addition to have.

In this blog series, we’ll explore how to leverage leading AI providers and service providers directly within PowerShell using their REST APIs, including:
- OpenAI (gpt/o1)
- Azure AI (gpt/various)
- Anthropic (Claude)
- Google AI (Gemini)
- X AI (Grok)
- Perplexity AI (Llama online)
We’re going to create a flexible AI assistant ready to provide pertinent help for all your PowerShell coding tasks, and don’t worry – all the PowerShell code has been created for you and is ready to go! This series will guide you through:
- Getting Started: Setting up accounts and accessing the APIs of major AI providers.
- Using AI in PowerShell: A step-by-step look at a custom PowerShell function designed to interact with multiple AI platforms seamlessly.
- Provider Comparison: Evaluating the cost, speed, and quality of PowerShell code generation across different AI models.
- Prompting Like a Pro: Tips and tricks for crafting effective prompts to get the best results from AI models.
What you need:
- An Azure subscription and Entra tenant
- An Azure KeyVault
- A little bit of PowerShell experience
- A few dollars to get started
In this first post, we will setup ourselves up with several different AI model providers. You don’t need to do this for all the providers if you don’t want to (you will need at least one though), but doing so gives you the flexibility to select from various different AI models that might best suit your needs in any given situation. The most involved of these will be Azure AI. This is not an AI model provider as such (although Microsoft do have their own models of course) but a managed service that allows you access to a variety of AI models, such as the OpenAI family of GPT models, as well as others such as Mistral and Llama. In addition they provide advanced services such as model fine-tuning and much more. Using the Azure AI service has the benefit of allowing you to be billed through your Azure subscription, and the usage monitoring in the service is very good.
Azure AI
Azure AI Foundry is Microsoft’s latest name for its AI Studio portal. Log in there at ai.azure.com.
Create a project
Click Create project to get started. Give your project an original name, then click Create new hub. Give the hub a suitable name and click Next.
You can then click Customize to change any of the hub parameters such as the Azure subscription, the resource group name, location etc. Under Connect Azure AI Search, you can ‘Skip connecting’ as we won’t need a search index this project.

Click Next, then Create and let Azure do its thing and create the required resources, which may take a few minutes.

Once it’s done, you should find yourself in the Overview page of the project.

Add AI models
In the left menu, under My assets, click Models + endpoints.
Under Model deployments, click Deploy model > Deploy base model.
Select the AI model that you want to deploy and click Confirm. For this example, I’m going to deploy the gpt-4o-mini model since it is super inexpensive and still has a reasonably good benchmark. I will talk more about different AI models in another blog.

You will then be asked to set some parameters for this model. I like to leave the deployment name the same as the model name to make it easy to reference. For Deployment type, I recommend Global Standard (this is actually cheaper than Regional Standard).
By clicking the Customize button, you can further customize this model, which I recommend.
If there are multiple model versions available, you can select the one you want to use.
The Tokens per Minute Rate Limit is important. It defines the maximum number of tokens the model will process in a minute. In the context of AI models, a token is unit of text which could be words, parts of words, characters etc. Input tokens refer to the number of tokens you pass to the AI model in your prompt. Output tokens refer to the number of tokens used in the models’ response. The number of tokens used is how you are charged for your use of the model.
Set this rate limit to what you think will be a suitable amount for your usage, then click Deploy.

The deployment will be ready very quickly.
You can repeat this process to add any additional models if you wish. I recommend adding gpt-4o as well as the mini version, and also the o1 models – although at the current time you need to register to get access to those.
If you want, you can open the Chat playground to test out your AI model with some sample prompts.
While we’re here in the Azure AI Foundry, go to the Models + endpoints page and locate your model. Click the Get endpoint button and copy the endpoint URL. We will need this for our PowerShell script. We don’t need the API key as we’re going to use Entra authentication to avoid having any keys in our script.


Grant role permissions
Next we need to grant permission to the AI service using Azure RBAC so that we can authenticate to it using Entra authentication.
In the Azure AI Foundry, open your project and go to the Management center (bottom left). In the Overview page for the project, over on the right you’ll see a link to the Azure resource group that contains your resources for this project. Click the link.
In the resource group, go to Access control (IAM). Click Add > Add role assignment. Search for and select the role Cognitive Services OpenAI User. Click Next.
In the members list, select the members you want to add to the role. Members will have the ability to chat with the AI models in the projects deployed to this resource group.
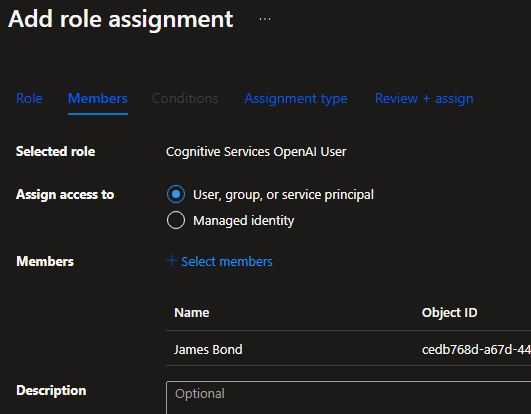
Click Next and set the parameters for the assignment type that you wish. Click Review + assign to finish.
Note: it may take a few minutes before the assigned permissions become active.
Monitoring cost and usage
You can monitor usage of your AI models from the Azure AI Foundry. Open the project then under My assets, click Models + endpoints. Open a model and click the Metrics tab. Here you can view some nice stats and charts.

If you click the Open in Azure Monitor button, you can use the regular Azure Monitor metrics explorer to chart even more metrics.

To view the cost, you’ll need to go to the Cost analysis section of the containing resource group in Azure. In the last week, for example, I’ve sent around 160 requests, used around 14oK tokens and it’s cost me a grand total of $0.21. Not going to break the bank here!

If you drill further into the AI Services resource, you can see that, even though I sent most of my requests to the gpt-4o-mini model, the gpt-4o model still cost me more to use. The mini model is a smaller and significantly cheaper model optimized for speed, but still gives pretty good responses.

Anthropic AI
Anthropic provide the Claude AI models, such as Claude Sonnet and Claude Haiku, which are some of the best for code generation. To get started with their API, head over to console.anthropic.com and sign up. Once signed in, go to Settings > Billing, add your credit card then add some credits (minimum US$5).

Then click on API keys and create a new API key. Make a note of this API key somewhere – later we will add it to Azure KeyVault.

From the Anthropic API portal you can also view your API usage and cost:


OpenAI
In addition to the gpt models, OpenAI also have the outstanding o1 models. At the time of writing the o1 models are also available in the Azure OpenAI service, but you have to register to get access to them. We can also access the o1-mini and o1-preview models via the OpenAI platform directly, along with their other gpt models as well, if you don’t want to use Azure OpenAI. With OpenAI, the flagship o1 model is currently only available to the enterprise-level usage tier 5 which is super-expensive, but hopefully it will come to tier 1 users too at some point.
Head to platform.openai.com and sign up. Once signed in, go to Settings (the cog icon) then Billing. Add a credit card and some credits (minimum US$5).

Under Project, click API keys. Create a new secret key. Again, make a note of the API key and we’ll later add it to Azure KeyVault.

Under the Usage tab, you can also monitor your usage and cost.

Google AI
Google offer the Gemini AI models which are extremely cost effective as they are free to use up to certain limits, so depending on how much you use them you may not even need to pay for anything at all.
To sign up, go to aistudio.google.com. Once signed in, if you aren’t already prompted there is a big Get API key button.
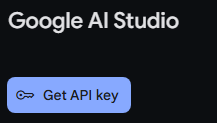
Generate an API key and again note it down somewhere.
Should you need to, you can set up billing by going to Settings > Plan information > Setup Billing. You can view usage stats by click View usage data.

X AI
X, formerly Twitter, allow access to their Grok AI models via REST API. To get started, go to console.x.ai and sign in or sign up.
Once signed in, go to Billing > Payment and add a payment method (unless you happen to have some free credits). Then go to Credits and purchase some credits.
I was lucky enough to sign up to an offer before the end of 2024 so I got some free credits to use 🙂

Next, go to API keys > Create API key. Again make a note of the API key.

To monitor your API usage and cost, use the Usage Explorer.

Perplexity AI
Perplexity AI is an AI search engine that searches the internet to provide you a response. I’ve included this because sometimes other AI models cannot return up-to-date information due to their knowledge cut-off dates. For example, if you ask an AI model for information that wasn’t available at the time they were trained on data, they may hallucinate and give you false information. Using Perplexity’s AI models fills that time gap – and they are also based on Meta’s open-source Llama models, some of which perform reasonably well with coding tasks.
To get started with Perplexity AI, head on over to perplexity.ai and sign up. Once signed in, go to Settings > API > Setup Payment. Add a credit card and purchase some credits (minimum US$3).
Then generate an API key and note it down.

You can view your cost and usage data by clicking View Dashboard.
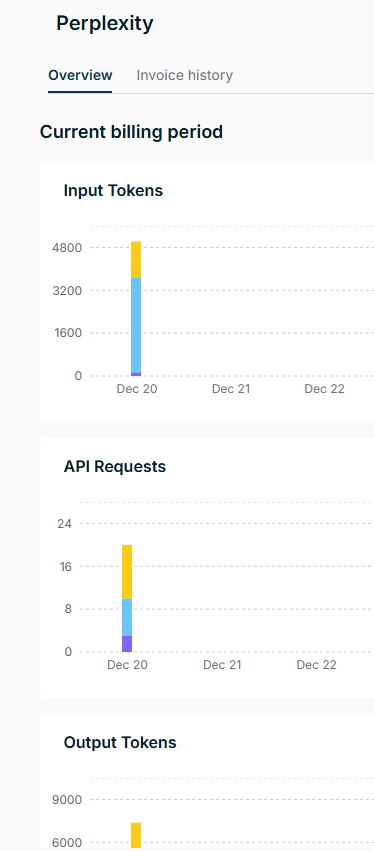
Note that Perplexity’s pricing model is slightly different. They charge both for API requests and input/output tokens. Whilst the token pricing is competitive, the cost per request of US$0.005 will be the most expensive part of the overall cost.
Storing your API keys in Azure KeyVault
Whilst we could simply add our API keys directly to our script this isn’t great security, so instead we will add them to an Azure KeyVault. This means we can then dynamically retrieve them at run time using Entra authentication.
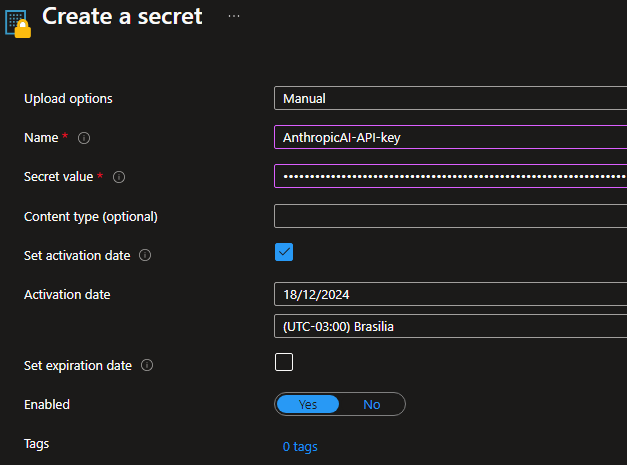
In the Azure portal, navigate to your KeyVault. Create a new secret for each of your AI providers. Make a note of the name you give each secret so we can add them to our script later.
Finally, whether you are using role-based access control or the now legacy vault access policies, ensure that your user account has permission to retrieve secrets from the vault.
Conclusion
Congratulations! You have completed perhaps the most time-consuming part of creating your AI assistant by signing up with the various AI providers and generating API keys. In the next post, we’ll dive into using a custom PowerShell script to interact seamlessly with these providers. From ad-hoc advice to script generation to code refactoring and solving complex challenges, your AI assistant can become an indispensable part of your coding experience.